Set up skills
Skills represent the abilities and credentials of your Resources. They allow you to find the right Resources for Jobs.
Navigate to Settings > Skills & Certifications to manage Skills. Resources can add Skills to their Talent Profiles.
The total number of Skills you can add to your database depends on your licence. By default, the maximum number of Skills is 5,000. Retain displays a warning when you are close to your limit, then disables the action to add new Skills when you reach your limit. To increase your limit, contact us.
About Skills
Use categories, subcategories, tags, fields, and levels to organise, customise, and increase usability of your Skills.
Skill Types
Skills in Retain are of one of three types.
- Skills
- Certifications
- Language
You can filter by each of these types when you curate your Skills taxonomy.
Skill Categories and Subcategories
Categories and subcategories allow you to organise your Skills. If a Skill does not belong to a category or a subcategory, Retain displays it in the Uncategorised category or subcategory.
Example
Category: Languages
Subcategory: European languages
Skills: German, French, Italian
Category: Information Technology
Subcategory: Office Administration
Skills: MS Excel, MS Word
For more information, see Category and subcategory actions.
Skill Tags
Skill tags make it easier to find the Skills you need, especially if you are not sure of the name of the Skill. They can be abbreviations, related Skills, or any additional information. A Skill can have any number of tags.
Example
You create a Skill called Soft Skills. You add the tags Adaptability, Communication skills, and Collaboration to the Skill.
You create a Skill called Management. You add the tags Stakeholder communication and Business development to the Skill.
You create a Skill called Software Development. You add the tags C++, Java, and C# to the Skill.
For more information, see Add a tag to a Skill.
Skill Levels
Add levels to a Skill to denote different amounts of experience with a Skill. When you create levels for a Skill category, Retain applies them to all Skills in that category.
Example
- Category: Software tools
- Custom levels: Proficiency
- Levels: Basic, Intermediate, Advanced, Expert
You add the Skill "MS Word" from the "Software tools" category to your profile and select the Proficiency level "Expert".
For more information, see Skill level actions.
Skill Fields
Add fields to a Skill category to allow Resources to add additional information to that Skill on their profile. Create unique fields for each category, or use the same fields for multiple categories.
Example
- Additional years of experience
- Courses taken
- Certifications acquired
For more information, see Add additional fields to a Skill.
Skill Expiry
Some Skills have a finite effective duration before they expire. Resources with these Skills must periodically renew them. When you enable Skill expiry on a Skill, if a Resource adds the Skill to their profile, Retain displays a field for the Skill's expiry date.
For more information, see Skill expiry actions.
Skill Endorsements
Retain allows Job managers to endorse a Resource for the Skills they use on a Job. This allows the managers to track qualitative contributions to a Job, in addition to the number of hours the Resource worked.
When you enable Skill endorsements, the functionality is available to the Job manager. The Job manager can also select a designated reviewer for a Job.
An endorsement can include an overall star rating, a star rating for specific Skills, comments for additional information and details, and merit badges.
A manager can also give suggestions for areas for improvements. The following areas for improvement are available by default.
- Client satisfaction
- Communication
- Documentation
- Job management
- Managed unexpected situations
- Meeting milestones
- Resource availability
- Team collaboration
- Timeliness
Add or edit areas for improvement in Settings > Values > Resource Skills review metrics.
For more information, see Skill endorsement actions.
Import Skills from the Retain Skills Library
In addition to creating custom Skills, Retain allows you to import Skills from the Retain Skills Library.
Note
The ability to import Skills from the Retain Skills Library is licenced functionality. To enable it, contact us.
- Navigate to Settings > Skills & Certifications.
- Select the category you want.
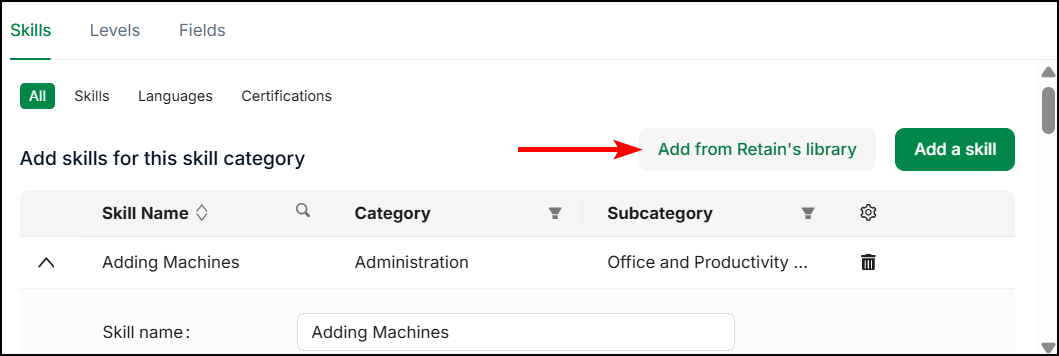
- Click Add from Retain's Library.
- Complete the import process and confirm the Skills you want to add.
Retain takes time to import Skills. View the progress from the Operation Log. - Refresh the application to see your Skills.
Category and subcategory actions
Create a Skill category
- Navigate to Settings > Skills & Certifications.
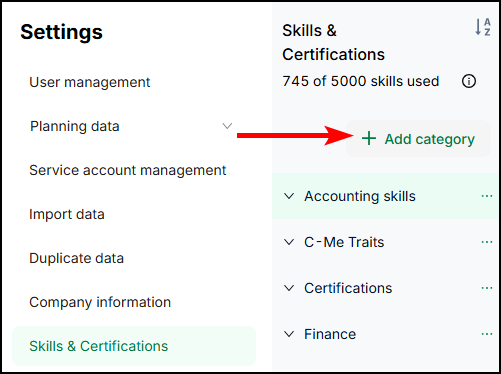
- Click Add category.
- Click the edit icon, then type the category name you want.
- Click Save Changes.
Add Skills to a category
- Navigate to Settings > Skills & Certifications.
- Select the category you want.
- Click Add a Skill.
- Type the Skill name you want.
- Complete any non-mandatory fields you want.
- Click Save changes.
Delete a Skill category
- Navigate to Settings > Skills & Certifications.
- Locate the category you want, click the ellipsis menu, then click Delete.
- In the confirmation panel that appears, check the confirmation box, then click Delete skill category.
Note
When you delete a category, Retain also deletes any subcategories and Skills nested under the category.
Create a Skill subcategory
- Navigate to Settings > Skills & Certifications.
- Select the category you want.
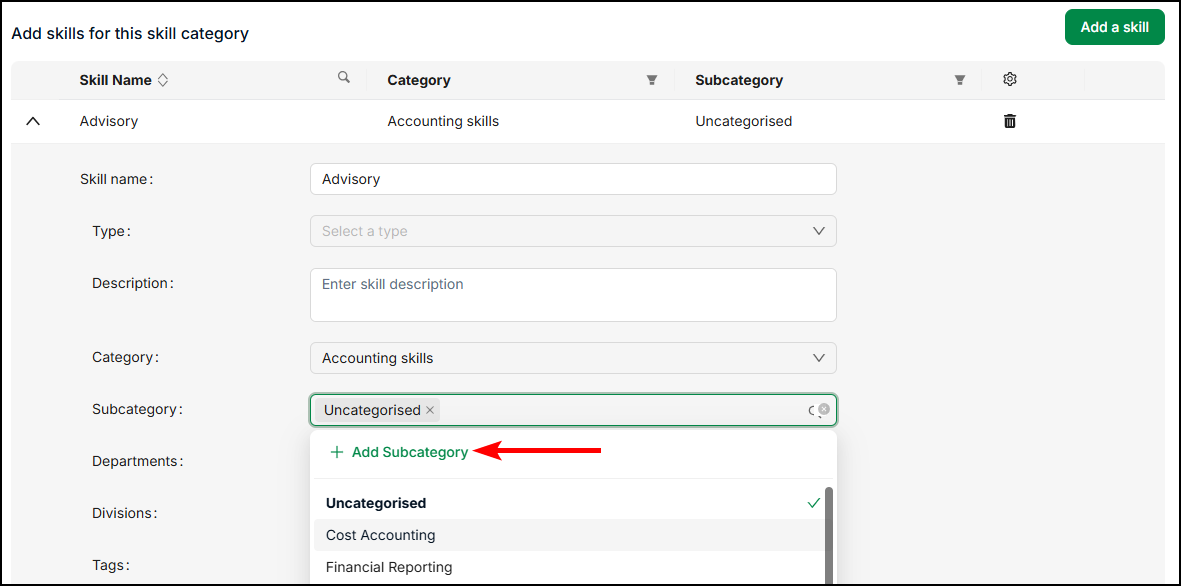
- Expand the Skill you want, then select the Subcategory field.
- Click Add New.
- In the Create Skill subcategory pane, type the Subcategory name, then click Create Subcategory.
Retain creates the subcategory and adds it to the selected Skill. - Click Save Changes.
Note
You cannot delete a subcategory manually. If there are no Skills within a subcategory, Retain deletes it.
Add a Skill to a Skill subcategory
- Navigate to Settings > Skills & Certifications.
- Select the category you want.
- Expand the Skill you want and select the Subcategory field.
- Select the subcategory you want from the list.
- Click Save Changes.
Filter categories and subcategories
Use the category and subcategory filters to find the Skills you need.
- Navigate to Settings > Skills & Certifications.
- Click the filter icon by the column header.
Retain displays a list of categories or subcategories. - Check the boxes of the categories or subcategories you want.
Alternatively, type the name of the category or subcategory you want, then select it from the search results. - Click OK.
Retain filters the list of Skills to the ones that match the categories or subcategories you selected.

Skill Level actions
Add a custom Skill level
Create a new set of levels for a Skill Category.
- Navigate to Settings > Skills & Certifications.
- Select the Skill category you want.
- Select the Levels tab.
- From the lookup list, select Custom Levels.
- Type the Level name.
- To add additional levels, click Add levels, then type the Level name for each level.
- Click Save changes.

Add an existing level to a Skill
Duplicate levels from another Skill Category.
- Navigate to Settings > Skills & Certifications.
- Select the Skill category you want.
- Select the Levels tab.
- From the lookup list, select Use Levels From.
- From the lookup list that appears, select the Skill category you want.
If the selected Skill category has levels, Retain adds those levels to the Skill category. - Click Save changes.

Reorder levels
Change the sort order of the levels on a Skill Category.
- Navigate to Settings > Skills & Certifications.
- Select the Skill category you want.
- Select the Levels tab.
- Click and hold the reorder icon and drag the level into the position you want.
Alternatively, click the sort icon and select a new position for the level. - Click Save changes.

Skill expiry actions
Enable Skill expiry on a Skill Category
Allow users to set an expiry date on a Skill in a specific category.
- Navigate to Settings > Skills & Certifications.
- Click Add category, or select an existing category.
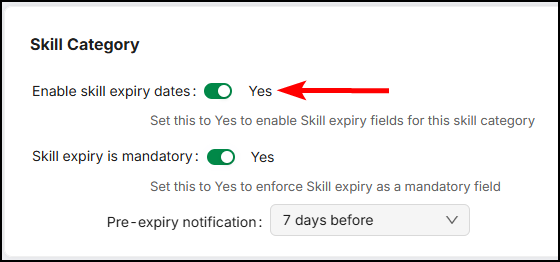
- Set the toggle Enable skill expiry dates to Yes.
- Click Save changes.
Make Skill expiry mandatory
- Navigate to Settings > Skills & Certifications.
- Click Add category, or select an existing category.
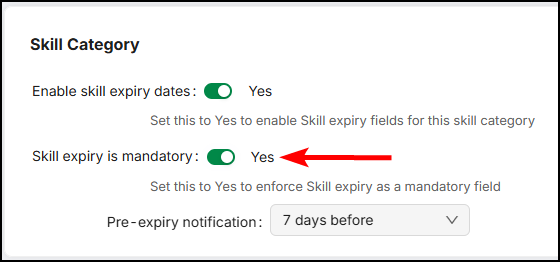
- Set the toggle Skill expiry is mandatory to Yes.
- Click Save changes.
Send a notification before a Skill expires
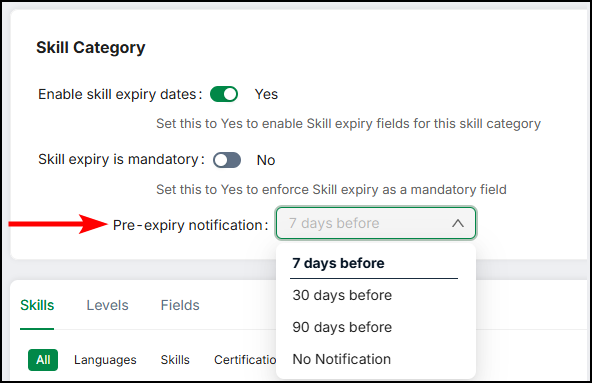
Resources should renew their Skills before they expire. Set up a notification to inform a Resource that their Skill is due to expire. Retain can send notifications with a lead time of seven days, 30 days, or 90 days.
- Navigate to Settings > Skills & Certifications.
- Click Add category, or select an existing category.
- Set the toggle Enable skill expiry dates to Yes.
- From Pre-expiry notification, select the lead time for the notification.
- Click Save changes.
Skill expiry notification types
In Notifications > Settings, select the types of Skill expiry notifications you want to receive, and the frequency of notifications.
- When a skill you have is expiring
Use this notification to renew your Skill before it expires. - When a resource you manage has a skill that's expiring
Use this notification to inform Resources and prompt them to renew their Skill before it expires. - Recommend skills to add to your profile based on your job title or primary skill
Use this notification to add new Skills to your profile.
All Skill notifications are available in the Web app and by Email. For more information on notifications, see Notifications.

Skill approval actions
Some users require a manager to approve changes to their Skills.
View Skill approval requests
- Navigate to Notifications > Requests, then click the notification you want.
Alternatively, navigate to the Profile of the Resource you want, then click Edit Skills. - Click Approval requests.
- To view active requests, select the Pending tab.
- To view previous requests, select the Historic tab.
Approve, reject, or edit Skill requests
- Navigate to the Resource's Approval requests. For more information, see View Skill approval requests.
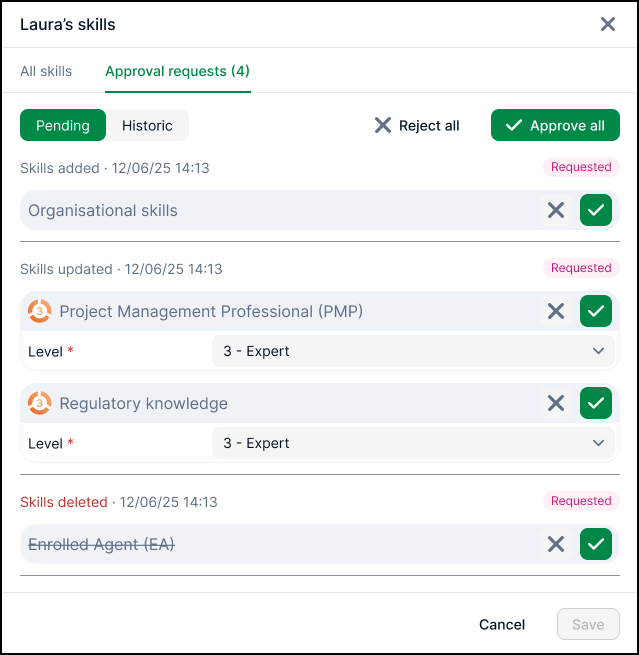
- To approve all requests, click Approve all.
- To approve a request, click the green tick icon.
- To reject a request, click the grey cross icon.
- To edit a request, make the changes you want to the Skill.
- Click Save.
When you approve, reject, or edit a Skill request, Retain sends a notification to the Resource.
Skill endorsement actions
Enable Skill reviews for a security profile
- Navigate to Settings > Security Profiles.
- Select the security profile you want, then open the Resource tab.
- To allow users with this profile to view Skill endorsements, set Can view public information from a Resource's Skills review to True.
When you enable this functionality, Retain enables two more fields. - To allow users with this profile to give or request Skill endorsements for a Resource, set Can (or can request someone to) review a Resource's Skills on a Job they manage to True.
- To allow users with this profile to modify existing Skills reviews, set Edit or delete anyone's Skills reviews to True.
- Click Confirm changes.

Enable Skill reviews on a Job
By default, the Reviews section on a Job is only visible to users with a security profile that allows Skill reviews. For more information, see Enable Skill reviews for a security profile. Once the Job manager enables Skill reviews, they can appoint another user as the reviewer.
- Navigate to the Plans page.
- Select the Job you want and open the Jobs pane.
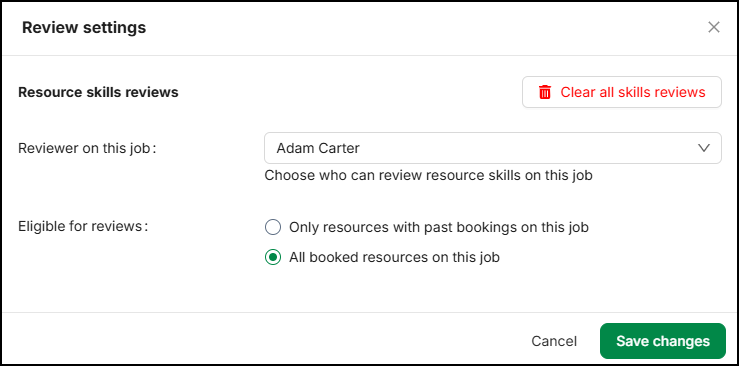
- In the Reviews section, click the settings cog.
- From Reviewer on this Job, select the Resource you want to give Skill endorsements for the Job.
- Select the requirements for a Resource to be Eligible for reviews.
- Click Save changes.
Leave a Skills review for Resources on a Job
- Navigate to the Plans page.
- Select the Job you want and open the Jobs pane.
- In the Reviews pane, click Submit Skills review.
Retain displays the Skills reviews modal. - Select the Resource you want to review, or select Rate all resources to apply your review to all Resources booked on the Job.
- Use the stars to give an Overall rating.
- Select up to six Skills for which you want to endorse the Resources, then use the stars to Rate their use of these Skills.
- If you want to highlight any shortcomings, select up to six Skills needing improvement and up to six Areas for improvement.
- (Optional) Write a Comment to give any additional information.
- To recognise a specific achievement or quality, Award a merit badge. Click the icon of a badge to award it. Use the arrows to scroll through badges.
- To save your changes without applying them, click Save as draft. Alternatively, to apply your changes, click Submit.
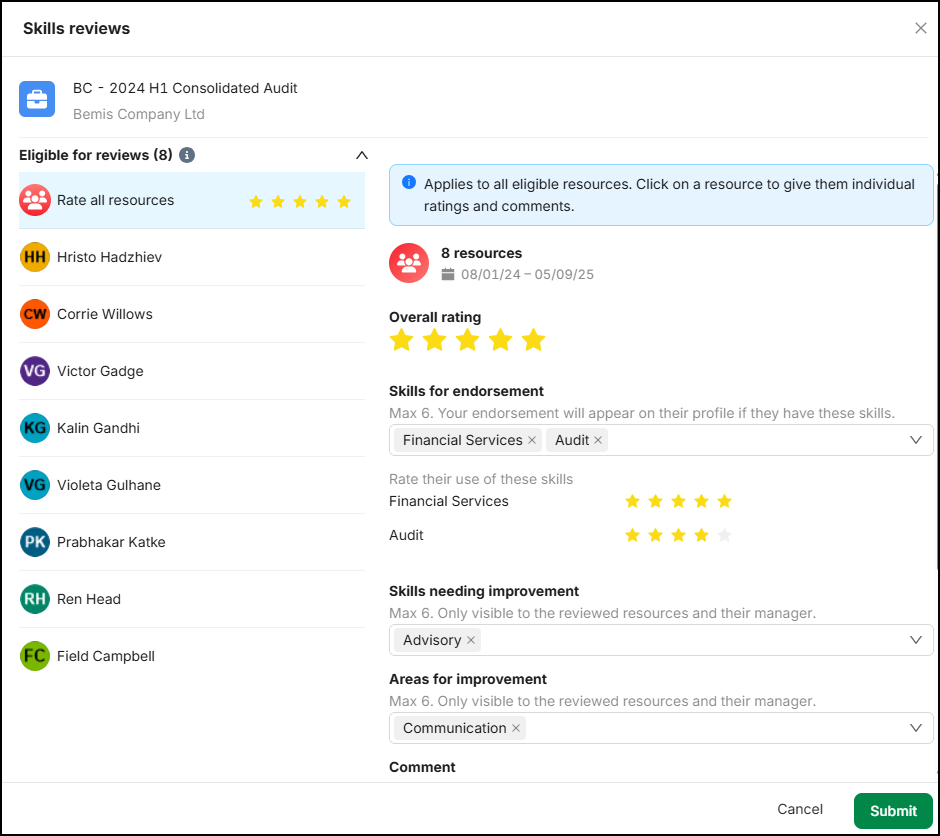
If you rate Resources individually, Retain calculates an overall rating for all Resources on the Job.
Note
If you review one or more Resources' Skills on a Job, then book additional Resources on the Job, in the Skills reviews modal, Retain groups the Resources in Eligible for reviews and Previously reviewed.
When you review a Resource's Skills on a Job, Retain sends the Resource a notification.
Configure the available Areas for improvement in Settings > System Settings > Values. For more information, see Set up the values in display lists.
Request the reviewer to leave a review for a Resource on a Job
- Navigate to the Plans page.
- Select the Job you want and open the Jobs pane.
In the Reviews pane, Retain displays the name of the reviewer in the action. - In the Reviews pane, click Request Skills reviews.
Retain sends a notification to the reviewer. For more information, see Manage Skill review notifications.

Clear all Skills reviews from a Job
- Navigate to the Plans page.
- Select the Job you want and open the Jobs pane.
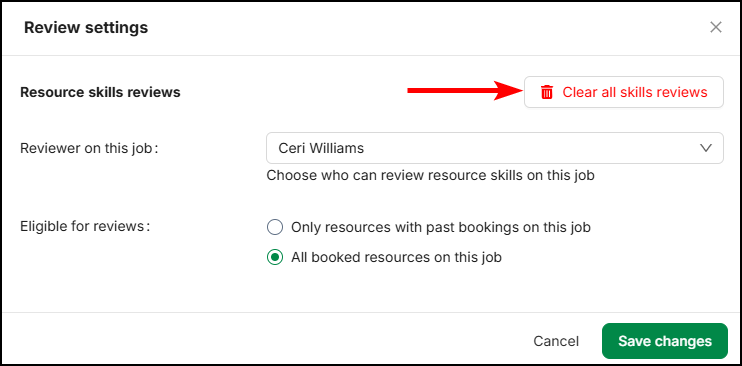
- Click the settings cog.
- Click Clear all skills reviews.
- Click Save changes.
Other Skill actions
Add additional fields to a Skill
- Navigate to Settings > Skills & Certifications.
- Select the Skill category you want.
- Select the Fields tab.
- Click Add a field, then select the type of field you want.
- Type a unique field name and a description.
- If you want the field to be mandatory, set the Mandatory toggle to Yes.
- Complete any additional fields.
- Click Save changes.

Add a department or division to a Skill
When you set a department or a division on a Skill, Resources who belong to that department or division will only see those Skills when they edit their Talent Profile. This streamlines the process for Resources to add Skills to their Profiles.
- Navigate to Settings > Skills & Certifications.
- Select the Skill category you want.
- Expand the Skill you want.
- Select the Department you want.
- Select the Division you want.
- Click Save changes.
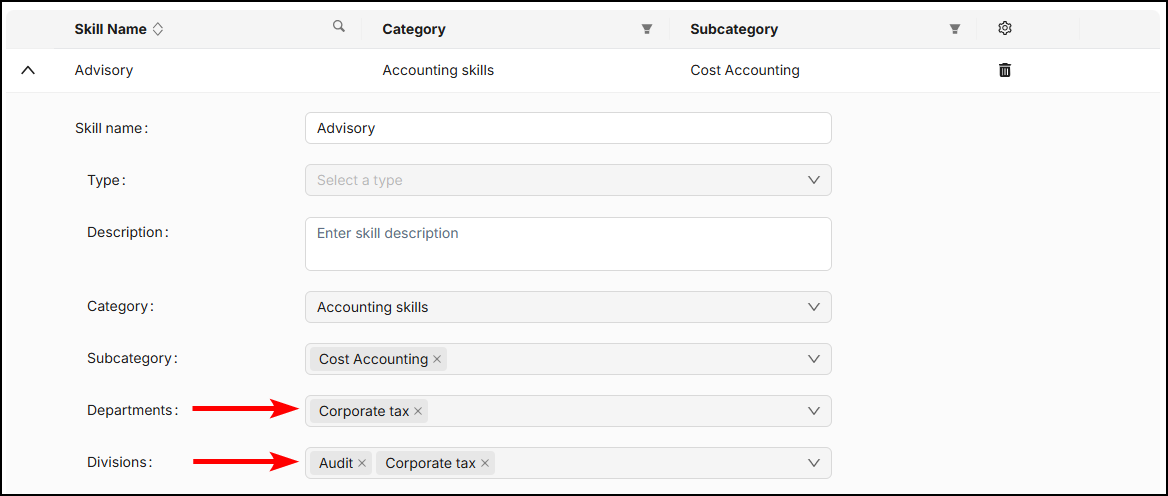
Skill departments and divisions do not affect filtering for Skills elsewhere in the application.
For more ways to control access to certain Skills, see Security.
Add a tag to a Skill
- Navigate to Settings > Skills & Certifications.
- Select the Skill category you want.
- Expand the Skill you want, then click New Tag.
- Type the name of the tag, then press Enter.
- Click Save changes.
