Set up the security
Understand security profiles
A security profile is a set of rights and restrictions that can be associated with a user or group of users. The security profile determines the actions (such as viewing, creating, editing and deleting) that a user can perform on jobs, resources, clients, roles, scenarios and bookings.
Understand default security profiles
The following security profiles have been created by default for you:
- System Administrator
- People Manager
- Job Planner
- General User
- Viewer
| Security Profile | Description | Functional access | Planning data access |
|---|---|---|---|
| System Administrator | Default security profile for a user creating a new organisation. | Access to all functionality. Has permissions to change user settings and reset passwords of other accounts. | Has permissions to create, view, edit and delete data for all jobs, resources, booking and clients. |
| People Manager | For human resource (HR) staff allowing management of resources without significant access to jobs and bookings. | Access to the planner. Access to the admin functionality for user management. No access to the job manager. | Create (invite), view, edit and delete permissions for all resources. Read-only access to booking, client and job entities. |
| Job Planner | Allows user(s) to manage jobs, manage bookings, and assign bookings to resources. | Access to the planner, including creating, editing and deleting public plans. Access the job manager and resource profiles to facilitate planning bookings and assigning resources. | Create, view, edit and delete permissions for bookings, clients and jobs. No permission for creating (inviting) new resources as adding new active users could change the cost of the application. |
| General User | Default profile for new users joining/being invited to an organisation. | Access to the planner and resource profiles. No access to the job manager. | Create, edit and delete bookings for themselves on any job via the planner. No permission to make changes to the jobs and client details. |
| Viewer | Intended for users that require visibility of plans but are not working on or managing jobs. | Access to the planner and resource profiles. | Read-only access to jobs, resources, clients and bookings. Can edit their own profile page. |
Set up functional security
Defines the following:
- Functional areas the user can access
- Hide budget section from Jobs, Roles and Bookings
- Operations that the user can perform within that area using pre-defined conditions
- Operations that the user can perform within that area using custom conditions
- Operations that the user can perform within that area using JSON
- Setting field level access
Control access to specific pages via a Security Profile
Allows you to control access to specific pages.
Example
If you want to restrict access to editing reports for certain users:
- Create a Security Profile
- Switch off access to edit reports (see the steps below)
- Users belonging to this Security Profile will no longer be able to edit reports
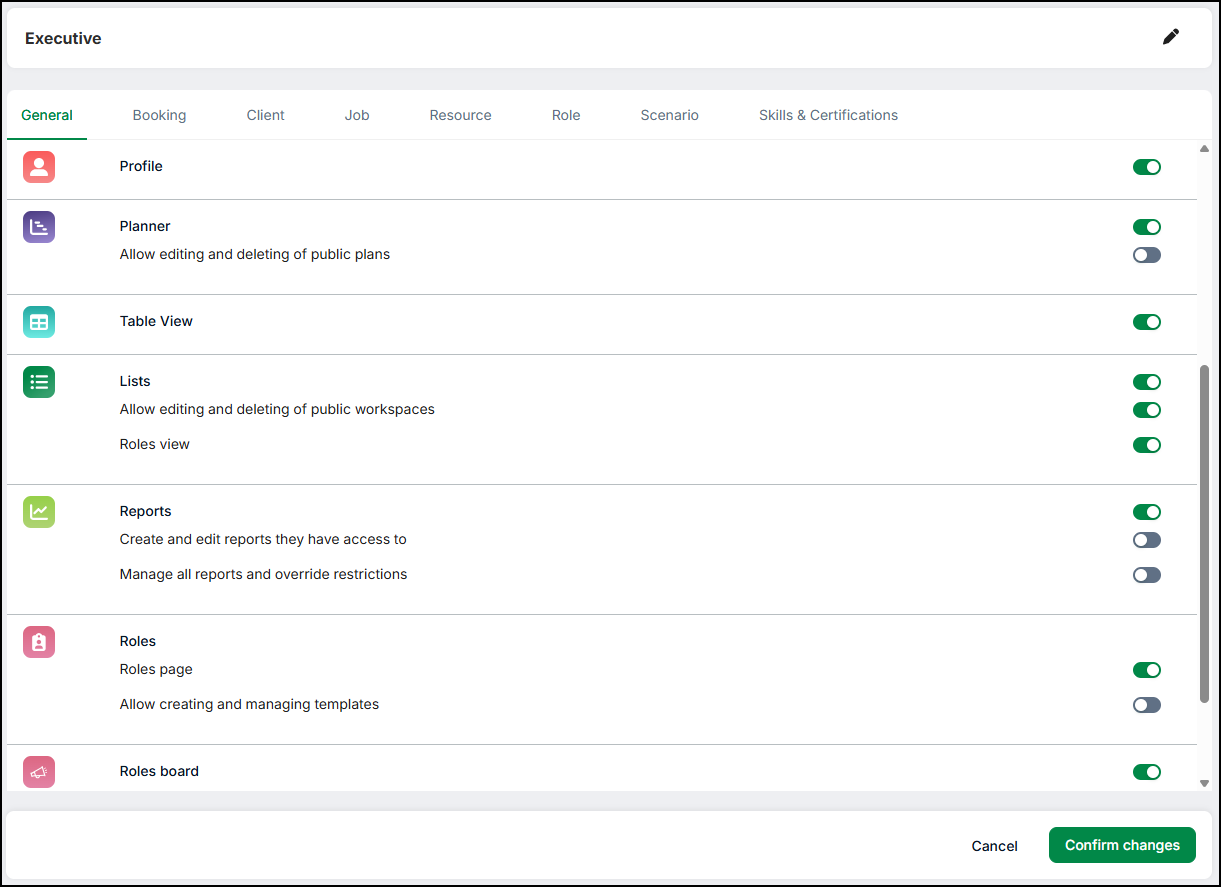
- Select Settings → Security profiles from the left navigation bar. A list of security profiles will be displayed
- Select a security profile for which you are setting up access or select Add an item to add a new profile by filling in the requisite details
- The General tab is selected by default
- Control access by selecting either a Yes or No for the relevant page under General. For example, if you select No for User Management, then this security profile will not have access to User Management. Users that belong to this security profile will not have access to User Management
Note
When the top-level access is set to No, all the sub levels are also set to No and vice-versa.
Hide Budget section from Jobs, Roles and Bookings
This section enables you to hide financial information from certain user groups or remove the financial fields from Retain Cloud entirely. Financial information can be hidden by selecting the financial fields to hide for each security profile. If you select to hide all financial fields, the Budget section will be hidden entirely.
To hide financial fields:
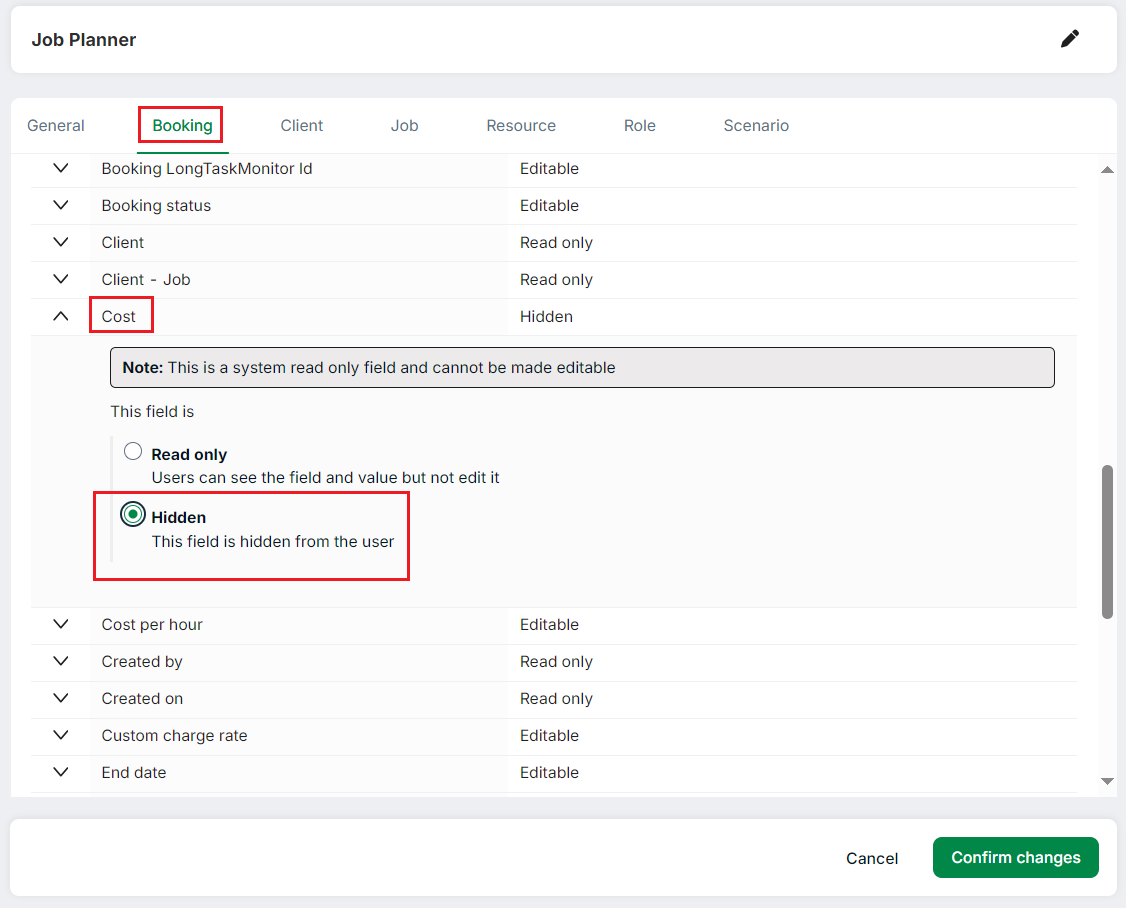
- Select Settings -> Security Profiles
- Select the Security Profile you wish to change
- Select the relevant tab you wish to hide the fields from e.g. Booking
- Select one or more fields you wish to hide e.g. Cost
- Select Hidden
- You may select more tabs like Job or Role and follow the same process
- Follow the above process for every security profile you wish to hide the fields from
- Click Confirm changes
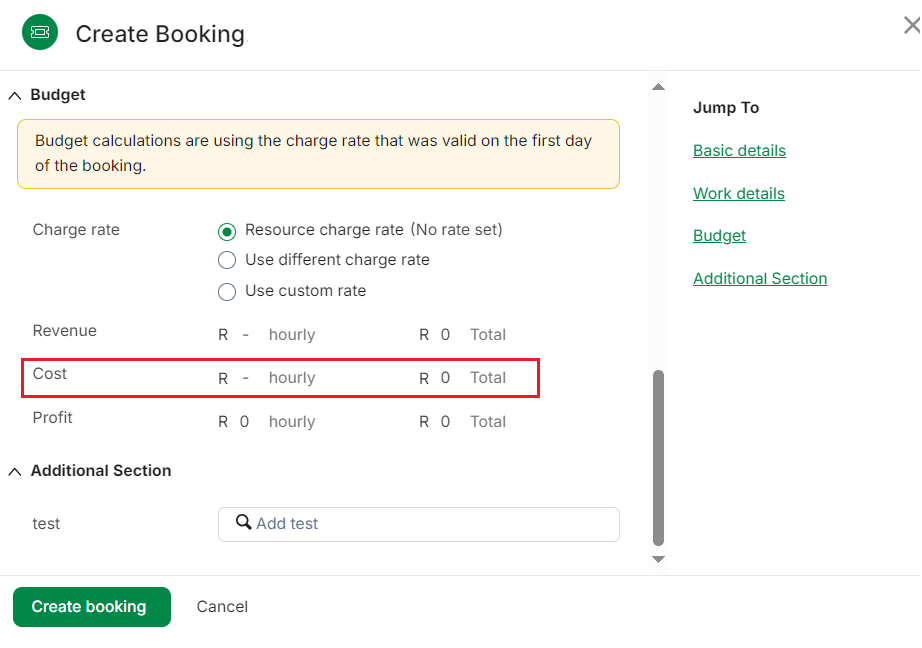
After carrying out the above steps, the following Cost field will be hidden from Booking form:
Skills Security
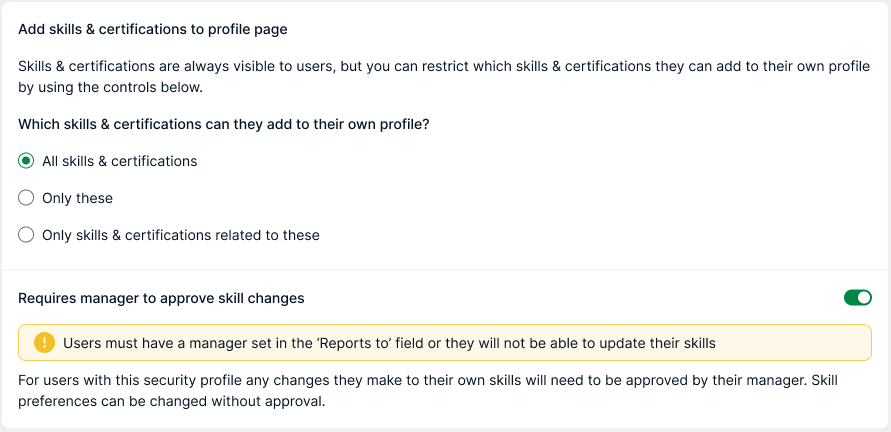
Retain allows you to select the Skills and Certifications that a Resource with a specific Security Profile can add to their profile. It also allows you to set the requirement for a manager to approve additions and changes to a Resource's Skills.
- Navigate to Settings > Security Profiles.
- Select the profile you want, then navigate to the Skills and Certifications tab.
- Complete the Which Skills and Certifications can they add to their own profile field.
a. To set no restrictions, select All skills and certifications.
b. To select specific Skills that the Resource can add to their profile, select Only these, then select the Skills you want.
c. To set the criteria of the Skills that the Resource can add to their profile, select Only skills and certifications related to these, then select the Skill Categories, Departments, Divisions, and Skill types you want. - To require a manager to confirm changes to a Resource's Skills, set the toggle Requires manager approval to approve skill changes to True.
If you set this toggle to true, users with this security profile cannot edit the Skills of a Resource if that Resource does not have a manager in their Reports to field. - Click Confirm changes.
For more information on how to customise and set restrictions on Skills, see Add a Department or Division to a Skill.
Control actions performed on Planning Data via the Security Profile using pre-defined conditions
Allows you to control access to creating, editing, deleting and visibility (reading) of planning data via a Security Profile by using pre-defined conditions. For resources, only edit and visibility access can be controlled. Users' access to creating/editing/deleting/reading of entities is controlled via the security profile that they belong to. Using pre-defined conditions to control access can be restrictive because you can only use the pre-defined conditions. For more control, you may create custom conditions and to create further complex rules, you may write your own JSON.
Note
Resources (or users) are controlled within the Admin settings for user licences.
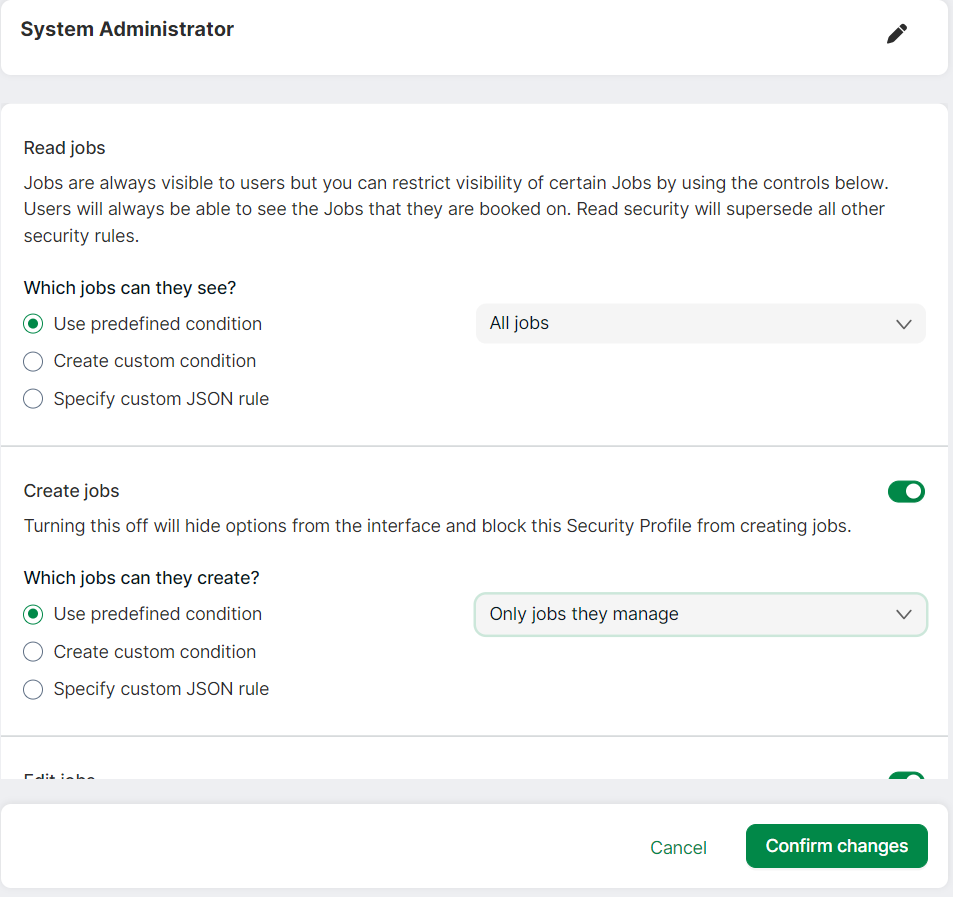
- Select Settings → Security profile from the left navigation menu. A list of security profiles will be displayed
- Select a security profile for which you are setting up access
- Select a tab, for example, Job
- Control read access to jobs by selecting a relevant option from the drowdown
- Control create, edit, delete access by selecting the relevant toggle for the relevant operation. For example, select Yes for Create jobs to allow creation of jobs
- If you select Yes then a dropdown with pre-defined options will be visible
- Select the relevant option from the dropdown. For example, if you select Only jobs they manage, then users who belong to the selected Security Profile will be able to create jobs only for the resources they manage
- Save Changes
Also see, control read access to planning data
Control actions performed on Planning Data via the Security Profile using custom conditions
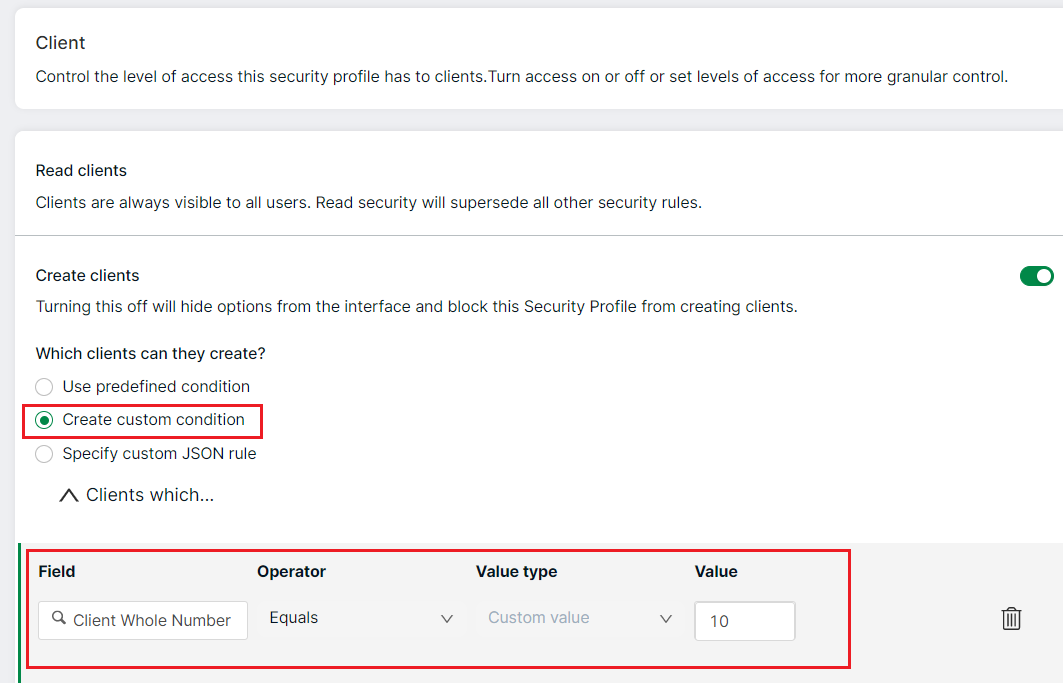
Set custom conditions for the Read, Create, Edit and Delete operations using AND/OR conditions. Using a predefined condition is restrictive as you can only use conditions that have been pre-defined. Custom conditions give you more control over the security rules.
- Select Settings → Security profile from the left navigation menu. A list of security profiles will be displayed
- Select a security profile for which you are setting up access
- Select a tab, for example, Client
- Select the Create custom condition option to create custom conditions by selecting values from Field (includes custom and calculated fields), Operator, Value type and Value. Also see understand value type
- Add And or Or conditions as necessary (you may add upto 3 OR conditions and upto 3 AND conditions)
- Custom condition rows can be deleted by clicking the trash icon to the right of each row
- Confirm changes
Understand value type
You may select the following options as value type:
- Blank: the Value option will not be displayed (condition is met if the field has no value)
- Logged-in user value which will be equal to the value of the logged-in user
- Selected values: A Value dropdown is displayed from which you can select values to use in custom and JSON conditions(condition is met if the field value matches the values set in the Value column). A maximum of 10 values can be selected
See fields to understand Look-up and other fields
Example:
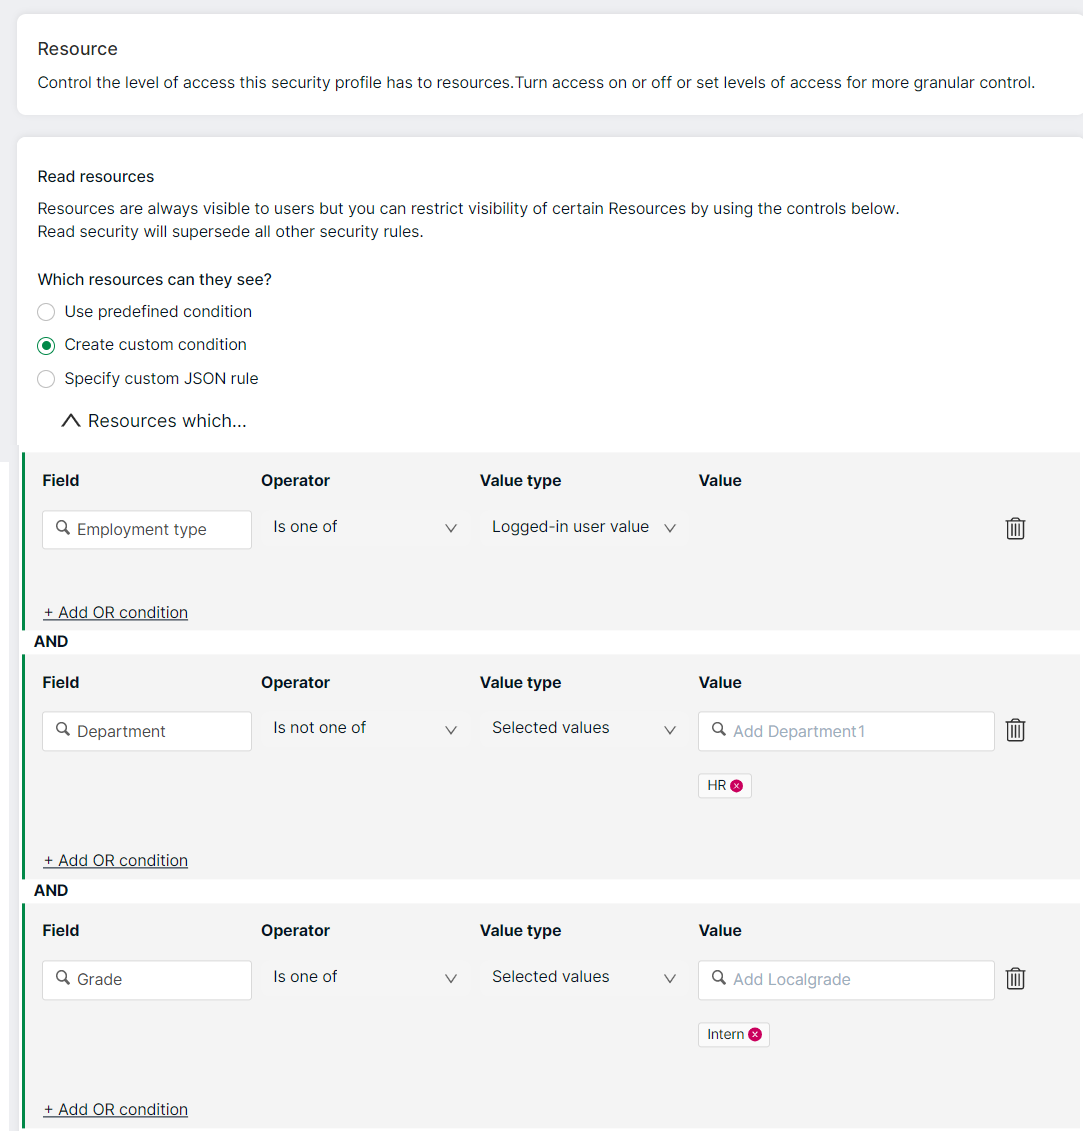
Note
- You can use the same field multiple times for each OR condition
- For Look-up field type, you can select multiple values for the Value field, and for Boolean or Whole number field types, you can select a single value for the Value field
- Custom fields also appear as values
- For bookings and roles, you can specify custom conditions on top of the read conditions set for jobs and resources
- The following are not supported in custom conditions and JSON rules:
- Plain text/Formatted text fields
- History fields
Control read access to planning data
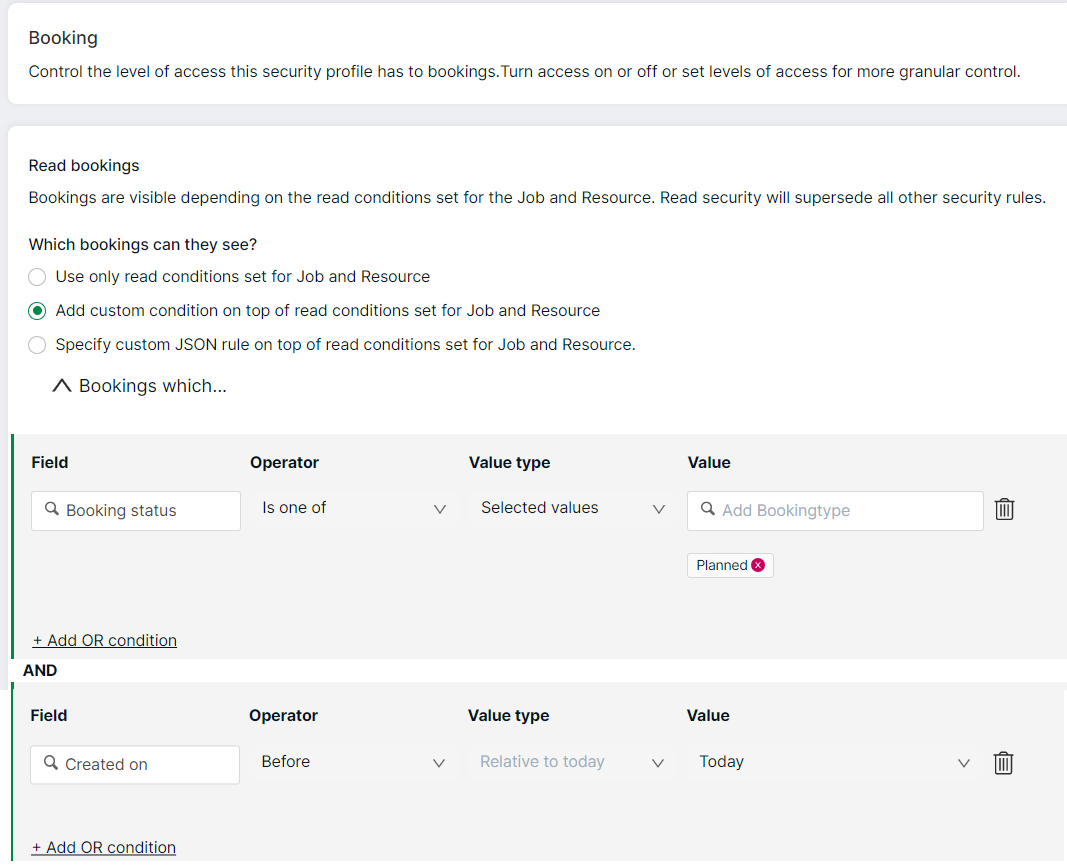
If you have high volumes of data or confidential data you wish to hide, then you can control access to this data by applying read restrictions.
You can apply read restrictions using the pre-defined and custom conditions for Jobs and Resources. You can apply custom conditions on top of read conditions set for Jobs and Resources for Roles and Bookings. You cannot set Read restrictions for Clients and Scenarios.
A few points to note:
- you can restrict the visibility of certain jobs and resources
- you will always be able to see the jobs you are booked on
- visibility of certain bookings and roles will be dependent on the read security of the parent Job or Resource, but you can set custom conditions on top of this
- read security takes precedence over other security rules. For example, if you do not have read, you will not have edit, delete and create
- the status of a job/resource does not affect visibility
- for Only jobs they manage, you will only see jobs where you are the Job manager. If no value is set, the job will be hidden
- all calculated fields take hidden fields into calculations. For example, even if Job B is hidden, any bookings on Job B are still counted for calculated field values such as availability and utilisation
- conflicts will display even if a job is hidden
Note
Ensure that there is at least one security profile who can see everything so that unassigned bookings or roles are not lost.
Also see, mark a job as confidential
Specify complex security conditions using JSON
The pre-defined and custom conditions options can be restrictive. To get full control of the security rules you can create custom JSON rules. For example, if you want the logged-in user to edit a job only if the associated client has set themselves as the 'client account manager' custom field, you can do so by specifying complex security conditions using JSON (as used in the API) to build more sophisticated rules that require multi-level links.
JSON rules are intended for advanced users. Use at your own risk.
Custom JSON rules can lead to a performance hit. Misconfiguration of JSON rules may lead to instability issues.
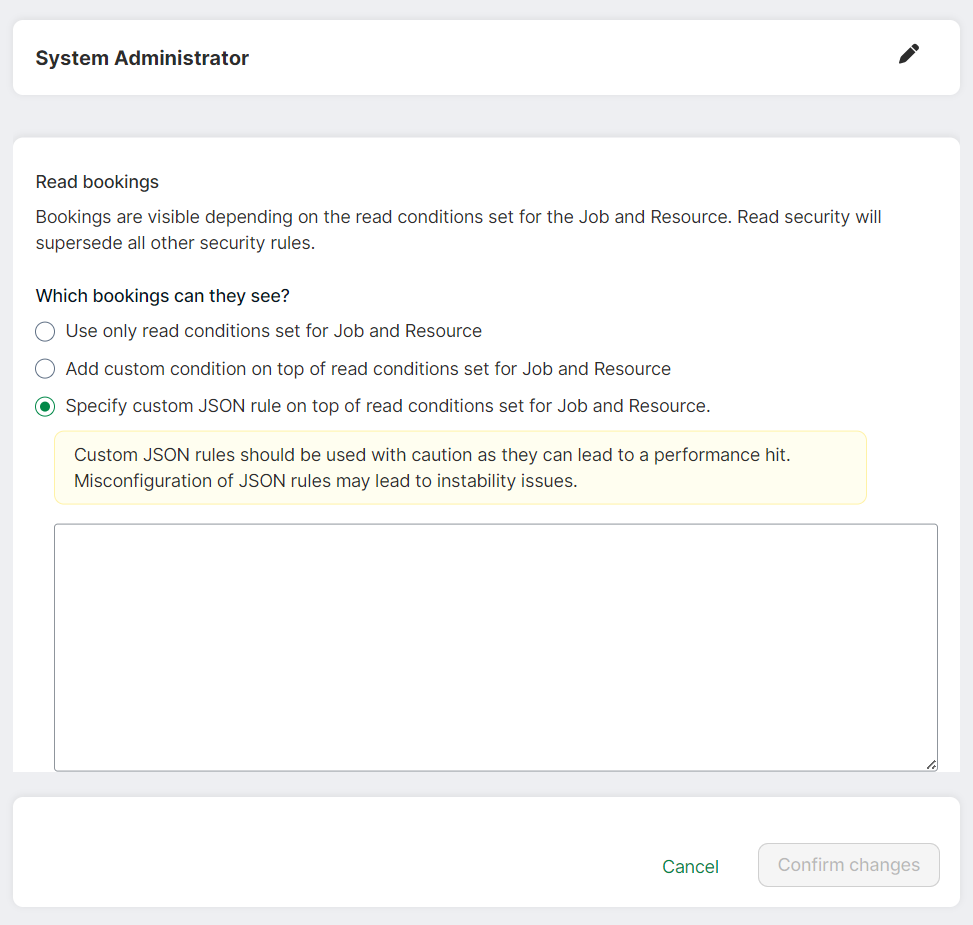
To set the JSON rules:
- Select a security profile
- Select an entity
- Select Specify custom JSON rule (these appear for Read, Create, Edit, Delete security cards)
- Paste or type your JSON rule in the area that opens up
- You may validate and test your JSON automatically by clicking away from the text area or manually via the API Portal link
- Confirm your changes by clicking Confirm changes. See the examples that follow
Note
Field names used in JSON rules are case-sensitive. Replace any spaces in field names with underscores. The field name must match the syntax in the application database. For more information on the correct field names as they appear in the database, see Get Field Names Of A table. Any JSON rule should be defined inside the subfilters only.
The following list of operators can be used:
- Equals
- GreaterThan
- GreaterThanOrEqual
- LessThan
- LessThanOrEqual
- In
- Range
- Assigned -->not null
- Unassigned --> null
- isNot is used for "Doesn't equal"
Note
Not all operators work with all field types.
Examples
Single rule
{
   "filterGroupOperator": "And",
   "filterLines": [],
   "subFilters": [
      {
         "filterGroupOperator": "Or",
         "filterLines": [
            {
               "field": "_field_name_",
               "operator": "GreaterThan",
               "isNot": false,
               "value": 6
            }
         ]
      }
   ]
}
Multiple rules
{
   "filterGroupOperator": "And",
   "filterLines": [],
   "subFilters": [
      {
         "filterGroupOperator": "Or",
         "filterLines": [
            {
               "field": "_field_name_",
               "operator": "GreaterThan",
               "isNot": false,
               "value": 6
            },
            {
               "field": "_field_name_",
               "operator": "GreaterThanOrEqual",
               "isNot": false,
               "value": "RELATIVE_DATE.0"
            }
         ]
      }
   ]
}
Combining AND OR rules
{
  "filterGroupOperator": "And",
  "filterLines": [],
  "subFilters": [
    {
      "filterGroupOperator": "Or",
      "filterLines": [
        {
          "field": "_field_name_",
          "operator": "GreaterThan",
          "isNot": false,
          "value": 6
        },
        {
          "field": "_field_name_",
          "operator": "GreaterThanOrEqual",
          "isNot": false,
          "value": "RELATIVE_DATE.0"
        }
      ]
    },
    {
      "filterGroupOperator": "Or",
      "filterLines": [
        {
          "field": "_field_name_",
          "operator": "GreaterThanOrEqual",
          "isNot": false,
          "value": "RELATIVE_DATE.0"
        }
      ]
    }
  ]
}
Configure a security profile to only show the bookings of the logged-in resource
The following example will only display the records of the resource who is logged in (booking_resource_guid which is equal to LOGGED_IN_USER_VALUE).
{
   "filterGroupOperator": "And",
   "filterLines": [],
   "subFilters": [
      {
         "filterGroupOperator": "Or",
         "filterLines": [
           {
               "field": "booking_resource_guid",
               "operator": "Equals",
               "isNot": false,
               "value": "LOGGED_IN_USER_VALUE"
            }
         ],
         "subFilters": null
      }
   ]
}
Configure a security profile to allow creation of bookings on specific jobs
This example allows the logged in user to create bookings on jobs they manage and specific jobs identified by the job guids in the list of values.
{
   "filterGroupOperator": "And",
   "filterLines": [],
   "subFilters": [
      {
         "filterGroupOperator": "Or",
         "filterLines": [
            {
               "field": "booking_job_guid.job_engagementlead_resource_guid",
               "operator": "In",
               "isNot": false,
               "value": "LOGGED_IN_USER_VALUE"
            },
            {
               "field": "booking_job_guid",
               "operator": "In",
               "isNot": false,
               "value": [
                  "job_guid1",
                  "job_guid2"
               ]
            }
         ],
         "subFilters": null
      }
   ]
}
Configure a security profile to allow creation of bookings on specific jobs with additional resource department restrictions
This example builds on the previous rule and also includes a restriction on creating bookings against resources in the same department as the logged in user.
{
   "filterGroupOperator": "And",
   "filterLines": [],
   "subFilters": [
      {
         "filterGroupOperator": "Or",
         "filterLines": [
            {
               "field": "booking_resource_guid",
               "operator": "Equals",
               "isNot": false,
               "value": "booking_resource_guid_value"
            }
         ],
         "subFilters": null
      },
      {
         "filterGroupOperator": "Or",
         "filterLines": [
            {
               "field": "booking_job_guid.job_engagementlead_resource_guid",
               "operator": "In",
               "isNot": false,
               "value": "LOGGED_IN_USER_VALUE"
            },
            {
               "field": "booking_job_guid.job_description",
               "operator": "Equals",
               "isNot": false,
               "value": "job_description_value"
            }
         ],
         "subFilters": null
      }
   ]
}
Configure a security profile to allow the user to edit a Job based on their Department
In this example, the logged-in Resource can only edit a Job if the Resource's Department matches the Job's Department.
{
   "filterGroupOperator": "And",
   "filterLines": [],
   "subFilters": [
      {
         "filterGroupOperator": "Or",
         "filterLines": [
            {
               "field": "job_current_department_guid",
               "operator": "In",
               "isNot": false,
               "value": "LOGGED_IN_USER_VALUE.resource_current_department_guid"
            }
         ],
         "subFilters": null
      }
   ]
}
Configure a security profile with multiple match requirements
This example requires the Resource to match the Client in two fields. The logged-in Resource can only edit a Client if the Resource's Division and Department both match the Client's Disivion and Department.
{
   "filterGroupOperator": "And",
   "filterLines": [],
   "subFilters": [
      {
         "filterGroupOperator": "Or",
         "filterLines": [
            {
               "field": "client_division_guid",
               "operator": "In",
               "isNot": false,
               "value": "LOGGED_IN_USER_VALUE.resource_division_guid"
            }
         ],
         "subFilters": null
      },
      {
         "filterGroupOperator": "Or",
         "filterLines": [
            {
               "field": "client_current_department_guid",
               "operator": "In",
               "isNot": false,
               "value": "LOGGED_IN_USER_VALUE.resource_current_department_guid"
            }
         ],
         "subFilters": null
      }
   ]
}
Configure a security profile with a JSON rule that uses custom fields
This example uses two custom lookup fields that share the same values list. The logged-in Resource can only edit a Job if the value in the Resource's custom field matches the value in the Job's custom field. The value lists in both custom lookup fields must be identical.
{
   "filterGroupOperator": "And",
   "filterLines": [],
   "subFilters": [
      {
         "filterGroupOperator": "Or",
         "filterLines": [
            {
               "field": "job_custom_job_custom_location",
               "operator": "In",
               "isNot": false,
               "value": "LOGGED_IN_USER_VALUE.resource_custom_resource_custom_location"
            }
         ],
         "subFilters": null
      }
   ]
}
An invalid JSON rule
In this example, In is used as an operator. This is invalid, as In can only be used in conjunction with multiple values in an array. This example only has a single value. This incorrect rule for booking_end could be corrected by using GreaterThanOrEqual or LessThanOrEqual as the operator.
filterLines": [
            {
               "field": "booking_end",
               "operator": "In",
               "isNot": false,
               "value": "RELATIVE_DATE.0"
            }
         ],
This example has multiple values. In is used with an array of GUIDs which is a valid way to use the operator.
"filterLines": [
        {
          "field": "booking_resource_guid",
          "operator": "In",
          "isNot": false,
          "value": [
            "f428277d-fe9e-4b6d-9ad5-b6be356c0302",
            "96c6f401-3537-4aad-9a28-0bef8d7e5c4f"
          ]
        }
      ]
Set up field-level access
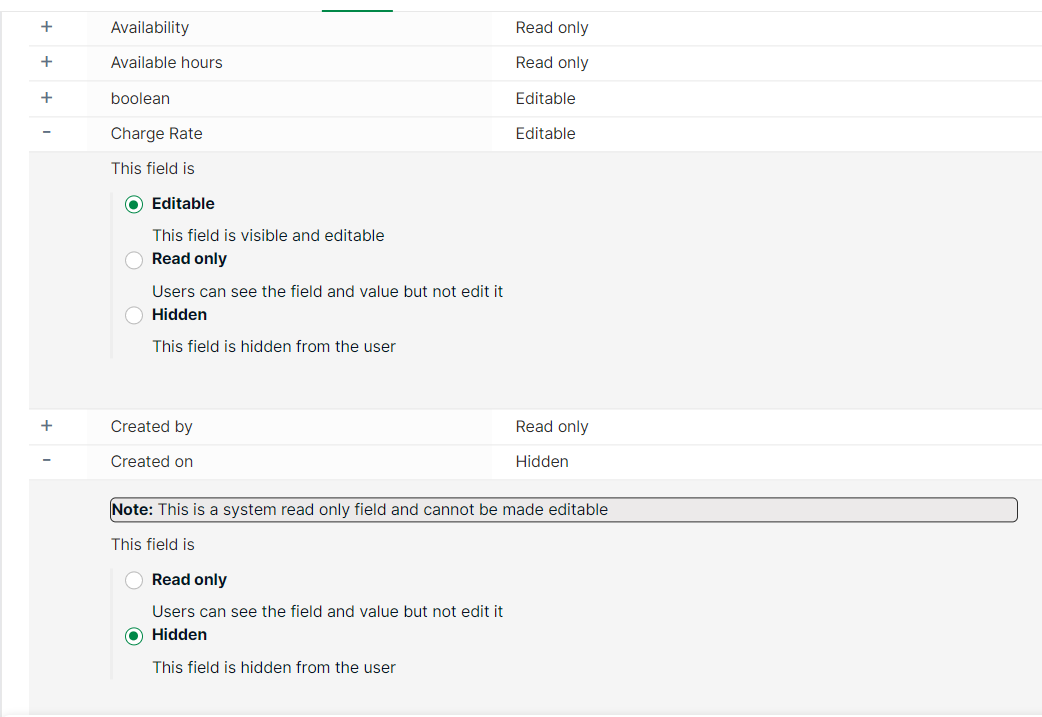
Control access to Booking/Jobs/Resources/Client fields with three access levels:
- Edit: Field is visible and contents are editable. This is the default access level
- Read only: Field and its contents are visible but not editable
- Hidden: Field is hidden (Fields will not be hidden from Admin Settings → Fields and from Plans → Themes)
Note
The above restrictions cannot be applied to Resource status as it is used to manage active users.
If Edit access has been turned off, selecting Editable for the field will have no effect on the field access.
A warning message is displayed if you select Read only or Hidden for mandatory fields.
System Required fields will not display the Hidden option.
System Readonly field cannot be made Editable.
To set up field-level access:
- Select Settings -> Security profile from the left navigation menu. A list of security profiles will be displayed
- Select a security profile for which you are setting up access
- Select the entity - Booking/Client/Job/Resources. Resource has been selected for this example
- Fields belonging to Resource will be displayed under the section Resource fields
- Each field will have a Field Name which is the field alias and an Access level which displays the current field access level
- Click the arrow and then select one from Edit/Read only/Hidden for the field
