Maintain roles
Add/Create a Role
Add/create a Role and save it as a draft. Roles can be added/created in six ways:
- Select Add from the top menu on the Planner and then select Role by name or Role by requirement
- Use the keyboard shortcut 'r' on the Planner for creating Roles by name and 'q' for creating Roles by requirement
- Select one or more horizontal cells on the Planner, right-click and then select Create Role by name or Create Role by requirement
- View a list of Scenarios on the Scenario details page. Click Add Role from the Roles section on the left, and then select Role by name or Role by requirement or Role from a template (see create a criteria Role from a template )
- View a list of Scenarios on the Scenario details page and click on a Scenario. From the list of Roles displayed on the right, click on a Role. A list of Roles will now be displayed. Click Add Role and then select Role by name or Role by requirement
- Select Roles from the left navigation menu and then select Add -> Role by name or Add -> Role by requirement from the top menu
- Create a criteria Role from a template
Note
- Create Role by requirements option is only displayed/enabled when you right-click on an Unassigned parent or child row. It will not appear when right-clicking on Resource child or parent row
- Create Role by name option is disabled in the 'Add' top menu when you select cells on an Unassigned parent or child row
Use one of the methods above to add a Role. A form with mandatory fields required to create a Role is displayed. The fields may differ based on the type of Role you have chosen to create.
See Role by name to create a Role by name.
See Role by requirements to create a Role by requirement.
Note: The newly added Role in the table is dependant on the default/custom sorting and/or filters applied which means that the new Role may not be visible in the current page view and you may have to filter, in order to view it.
Role by name
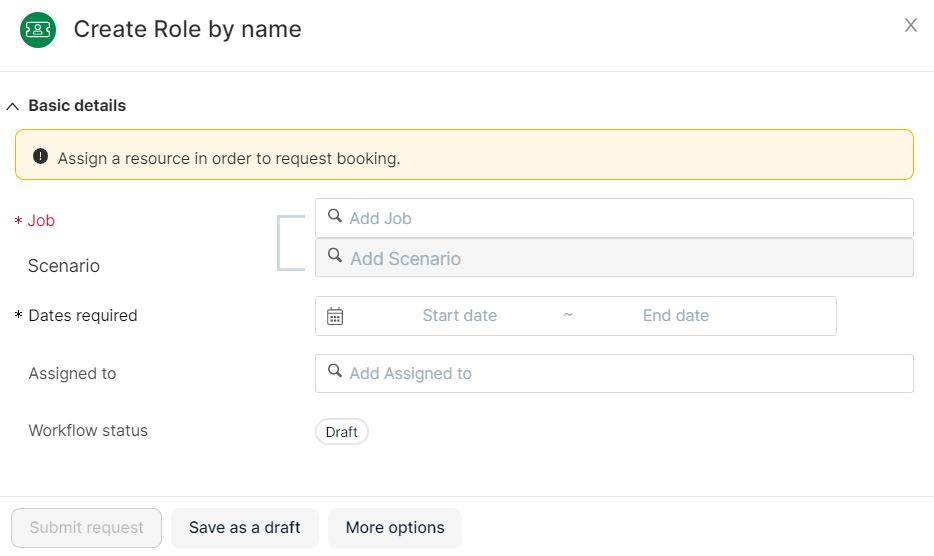
- Fill in the fields. Enter the first three characters of the Job to reveal a list of matching Jobs or you can click Add filters to add filters and select Jobs. If the Job you enter does not exist, you can create a new one by clicking + New Job
- For Role by name, an active Resource can be assigned to the Role in the Assigned to field. If you leave the Assigned to field blank, then the Role will be unassigned. Assigned to field is not displayed for Role by criteria
- Enter the start and end dates
- To create an Ungrouped Role, enter the Job and leave the Scenario blank. If you wish to create a Scenario, enter the Scenario
- More options will display additional fields (only on the Planner and Roles page)
- Click Save as a draft. Role is created and saved as Draft
- You may then create (make live) or submit a request for a Booking (depending on your permissions)
Role by requirements
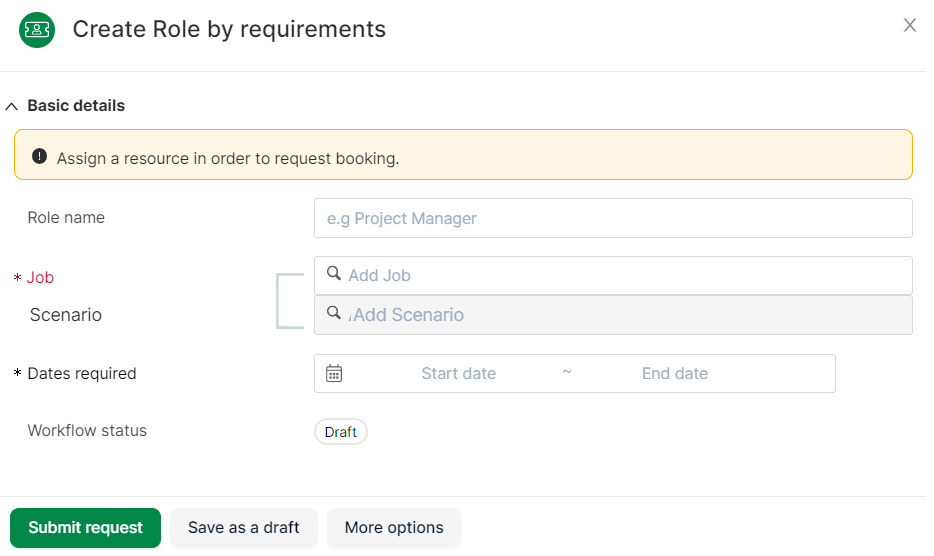
- Fill in the fields. Enter the first three characters of the Job to reveal a list of matching Jobs or you can click Add filters to add filters and select Jobs. If the Job you enter does not exist, you can create a new one by clicking + New Job
- To create an Ungrouped Role, enter the Job and leave the Scenario blank
- Enter the start and end dates
- Click More options to display additional fields (only on the Planner and Roles page). See understand time allocation and understand budget
- To add requirements, see the Add Requirements section
- Click Save as a draft. Role is created and saved as Draft
- You may then create or submit a request for a Booking (depending on your permissions)
Add Requirements
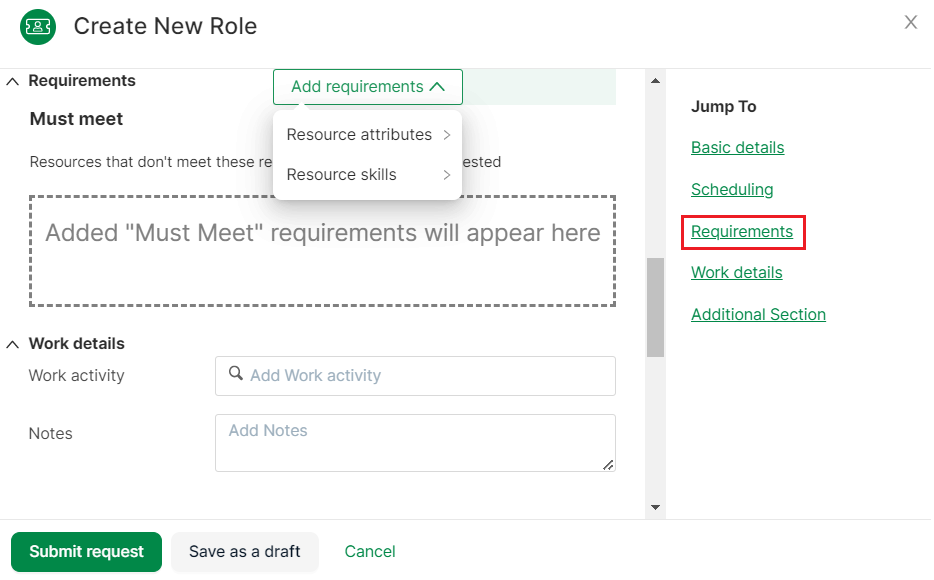
Click on Requirements (displayed after you click More options while adding a new criteria Role) to display the Requirements section.
-
Click Add Requirements dropdown on the form
-
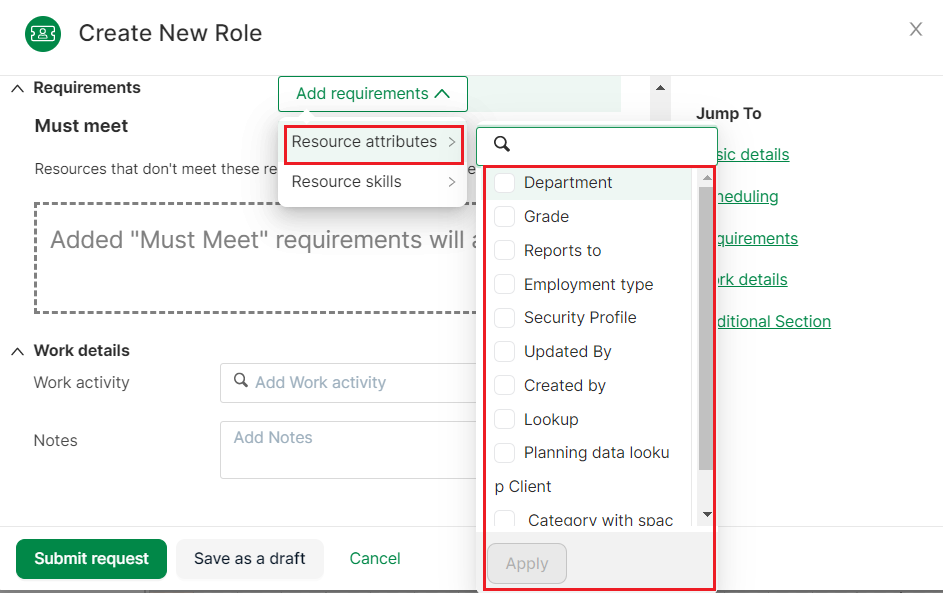
Select one or more attributes/skills from Resource attributes or Resource skills as required for the Role. For example, you can select 'Location' and then select 'London' and 'Paris'. You can also specify the required level for skills that have levels. Apply the selections
- The selected attributes/skills/levels will now be displayed in the Must meet section on the same form
- Resources that meet these requirements will be suggested on viewing the suggestion pane. For example, If you choose Location as a requirement and then enter 'London' and 'New York', then Resources available in London and New York will be suggested. If you have AI enabled, Resources will also be suggested based on Resources' past experience with Clients. Resources with similar skills, even those whose skills don't match the requirements perfectly, will also be suggested
Lookup fields support multiple values as shown in the screenshot below:

You can remove an added skill/field in two ways:
- Click Add requirements and simply uncheck the skill/field and apply the changes
- Click the 3-dot menu for a skill/field and select Remove from the menu
Note
- Role by requirements will only have one time allocation option - hours per day
- The requirements (Role name and attributes) for Roles by requirements can be saved as a template
- Save template button is only available to Roles by requirements
Create a criteria Role from a template
- Select Role from a template from the List view page Add Role menu (or from Roles Inbox page Add top menu or Planner page Add top menu)
- Existing templates will appear alphabetically in the menu
- Select a template. List view allows you to select one or more templates.
You can only select one template on the Roles and Planner page - Click Apply
- The applied Role templates will appear in the Roles list on the Scenarios page
- Fill in the mandatory fields
- Click Submit request
View Roles
Roles can be viewed in three ways:
On the Roles inbox
You will be able to edit, filter and progress Roles from this page.

- Click Roles from the left navigation bar
- List of all created Roles is displayed
- Expand the collapsible row to view Resources assigned to the criteria Roles. You will easily be able to see the assigned Resources which are related to the selected criteria Role and how many more Resources or FTEs are needed to fill the time allocation set for the criteria Role. Assigned Resources are ordered in the way they were assigned. Rejected assignees appear at the bottom of the expanded criteria Role row with the last rejected assignee appearing on the top
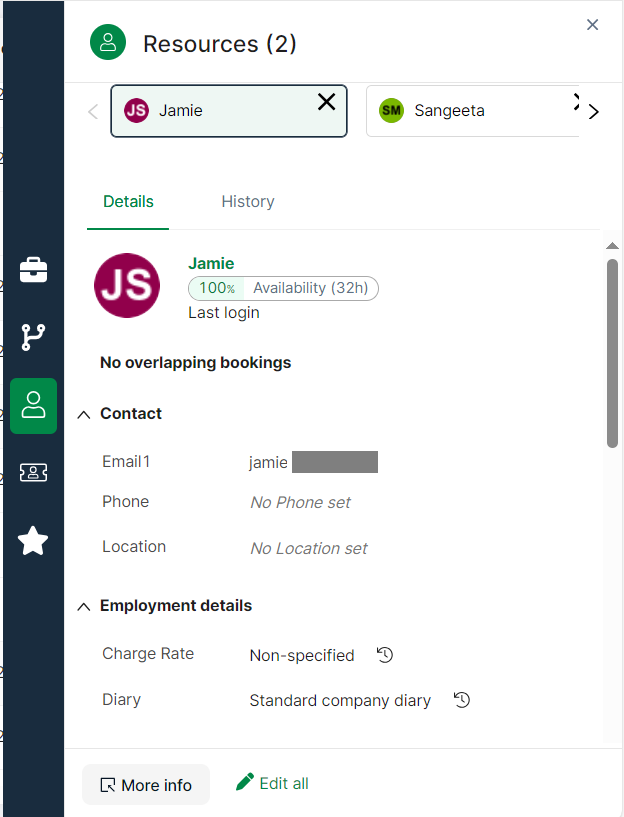
- To view multiple Resources assigned to the Role, click on an assigned criteria Role name and then click on the Resource pane. Resources will be displayed at the top of the pane as shown below
For criteria Roles:
- Time allocation is displayed in the Role column e.g. 2 FTE (7.5 hours per day) or 3 Resources (7.5 hours per day)
- Resources assigned to the criteria Role display the FTE or hours per day assigned to them in the Role column
- For Requested criteria Roles, the pending FTE or Resources display in the Role column
- If the assignees to the criteria Role are Requested, Rejected, have multiple statuses or are partially Live, then the Role workflow status is replaced with the Requested status badge along with a pending bar which shows the FTE or Resources pending for the Role to be Live
On the Scenarios details page
On the Planner

Roles can be viewed on the Planner as bars. Role bars are displayed as unconfirmed Bookings with the first letter of the Role status placed within a circle as a badge on the right side of the bar. If bar is too small, the Role status may not be visible. Only draft and requested Roles are displayed. Archived Roles are not displayed. See how criteria based Roles are displayed on the planner.
Like Bookings, you can also rotate a selected Role between the Jobs and the Resources view on the Planner.
On the Role Pane
- Click on a Role in the Planner/Role inbox
- The Role pane is displayed
- Information about the Role can be viewed on the Role pane
Edit a Role
Draft Roles can be edited:
To edit Roles in bulk, see bulk edit
On the planner
There are five ways to edit a draft Role from the planner:
- Select a Role, right-click and select Edit
- Select a Role and then select Edit → Edit details from the top menu
- Select a Role and use keyboard shortcut 'e'
- Drag the edges of the Role bar to change the start and end date (applies only to draft Roles and is dependent on security permissions)
- Select a Role and select the Role pane. Click Actions → Edit on the Role pane
- Choose one of the methods listed above
- Make the required changes and save
On the Roles inbox

- Select Roles from left navigation menu
- A list of Roles is displayed
- Select the 3-dot menu for a Role you wish to edit
- Select Edit details
- Make the necessary changes
- Save
On the Scenario page
- View Roles in a Scenario
- Click on a Role to view details
- Edit the details
- Click Save changes
Bulk edit Roles
When you bulk edit Roles, you can only edit either Roles by name or Roles by requirement. You cannot edit Roles by name and Roles by requirement simultaneously. You can only bulk edit draft Roles.
- From the navigation pane, select List view.
- From the top bar, select Roles. Retain switches to Roles view.
- Locate the Roles you want and check the boxes for each one.
- Click Edit.
-
To edit the selected Roles by name, click Edit Role by name.
To edit the selected Roles by requirement, click Edit Role by requirement.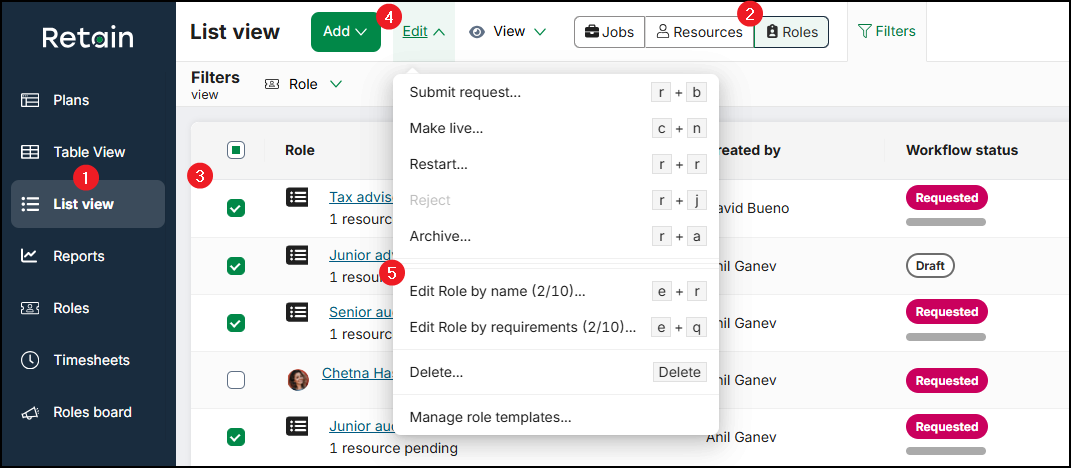
The Edit Roles form opens. The top of the form displays the number of selected Roles, their type, and the primary details of each one.
-
Select the Fields you want to edit.
- For each field, select the new value you want.
-
Click Save all.
Retain updates the data for all of the selected Roles.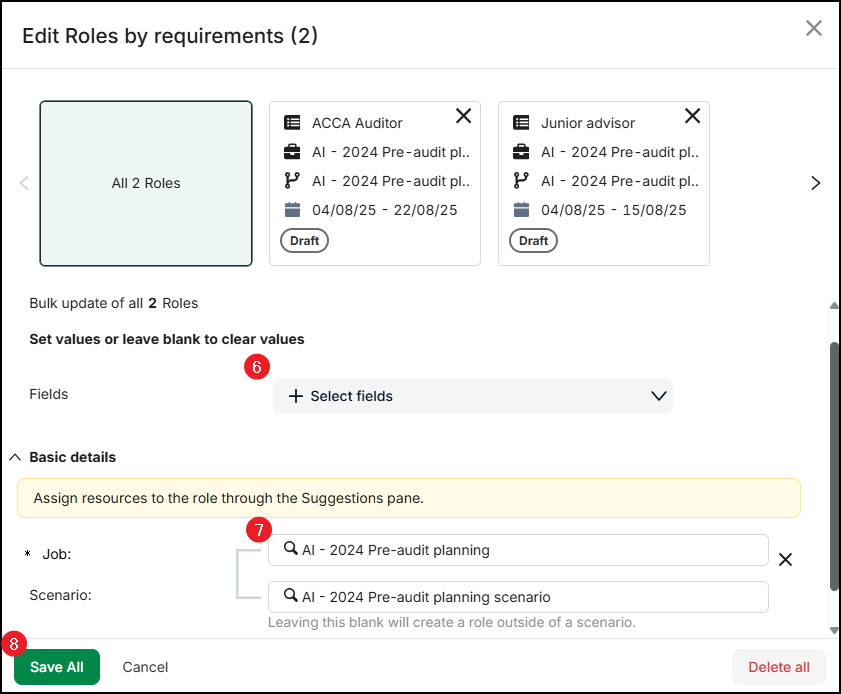
Note
- The maximum number of Roles you can bulk edit at once is the number of visible Roles on the grid. Use the pagination options to change the number of visible Roles on the grid.
- You must have permission to edit Roles individually to be able to edit them in bulk.
Delete a Role
You can delete a Role from:
To delete Roles in bulk, see bulk delete.
From the Scenario details page
- Click the 3-dot menu for a Scenario
- Click Open. All Roles belonging to the Scenario will be displayed
- Select a Role and click Delete from the 3-dot menu
Note
- Roles of any status can be deleted
- Deleting a Live Role will only delete it from the Scenario
- The associated Booking will not be deleted
From the planner
There are four ways to delete a Role from the planner:
- Select a Role, right-click and select Delete
- Select a Role and then select Edit → Delete from the top menu
- Select a Role and select the Role pane or double click on the Role bar. Click Actions → Edit → Delete Role
- Press the Delete key on your keyboard
From the Roles inbox
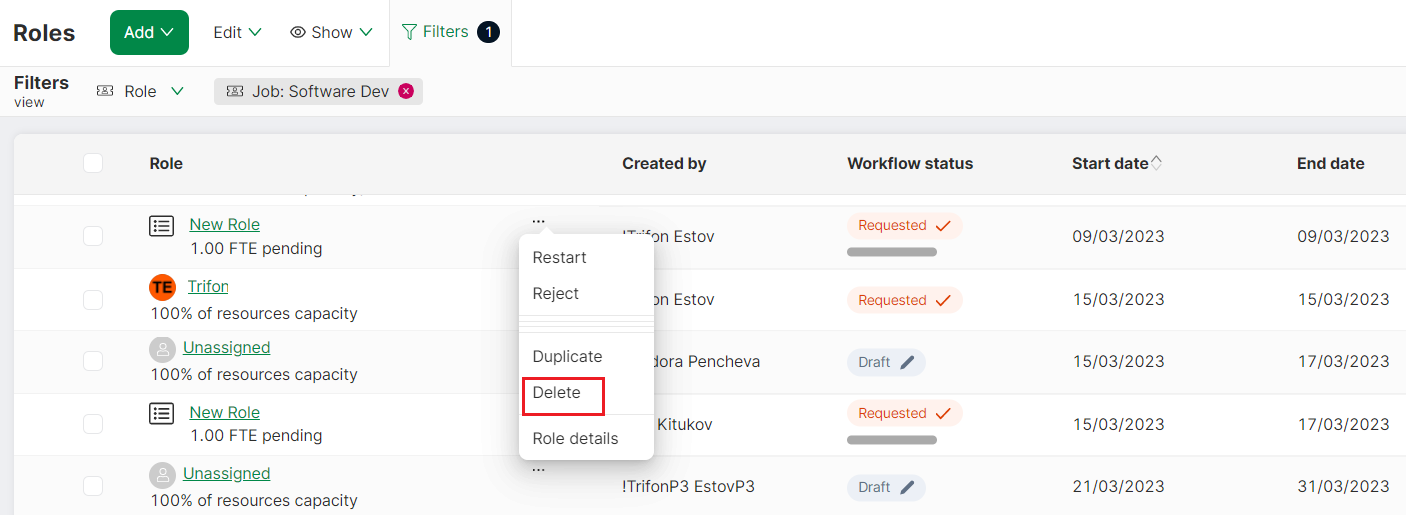
- Select Roles from left navigation menu
- A list of Roles is displayed
- Select the 3-dot menu for a Role you wish to delete
- Select Delete
Filter Roles
By name/requirements/Role status/assignee status
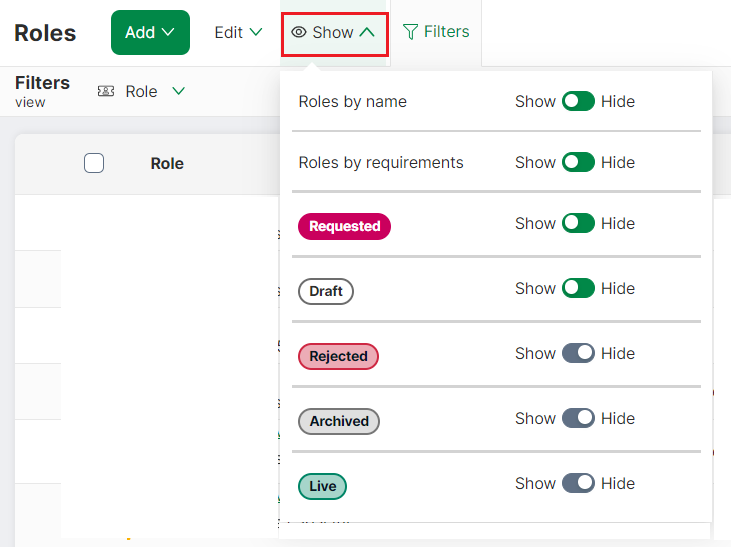
- Select Roles from the left navigation bar
- Select Show from the top menu
- Select Show/Hide for the respective options depending on your requirements
Note
Parent criteria Role row will always display when filtering. The assignee row (child) will only show if their status matches the set filter.
For example, if there is a Rejected unassigned criteria Role and a Requested criteria Role with a Rejected assignee and if you filter by Rejected, then both the Rejected criteria Role and the Requested criteria Role with the Rejected assignee will be shown in the Roles inbox.
By Assigned to/Scenario/Job/other fields
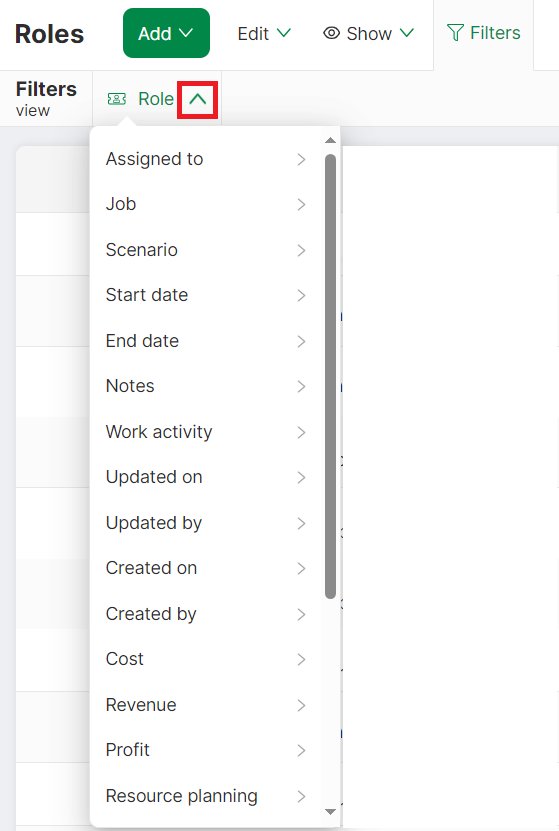
- Select Roles from the left navigation bar
- Select the arrow next to the filters option to display a picker
- Select a field and then select a value for the field
- Click Apply
For example, if there is a Rejected unassigned criteria Role and a Requested criteria Role with a Rejected assignee, and you filter by Rejected, both the Rejected criteria Role and the Requested criteria Role with the Rejected assignee will be shown in the Roles inbox.
Cut/Copy/Paste a Role
You can cut/copy and paste draft and requested Roles on the planner. Only non-criteria Roles can be cut/copied/pasted. Roles can only be pasted in the same Job. The Assigned to and Dates required values will update automatically depending on where you have pasted the Role. When you paste a Requested Role, it becomes a Draft Role.
Roles can be cut/copied in several ways:
- On the planner, select a Role, right-click and select Cut/Copy
- Select a Role on the Planner, select Edit from the top menu and then select Cut/Copy
- Use keyboard shortcuts: Ctrl + C/V (Cmd + C/V on MacOS) and Ctrl + X/V (Cmd + X/V on MacOS)
The options listed above can also be used to paste. Simply select a cell and use one of the options above to paste.
Note
The following cannot be cut/copied/pasted:
- where the assigned Resources are Inactive
- System-readonly fields and calc-fields as the values will be automatically derived
Configure Role bar fields on the planner
View information about Roles on the Booking bars by selecting the fields you wish to display.
- Select View → Bars → Role bar fields from the top menu (Another option is to select Bars → Role bar fields from the top menu)
- Select the fields you want displayed on the Booking bar
- Click Apply
See how Roles can be viewed on the Planner.