Maintain Jobs
Create a Job
- Click List view from the left navigation menu, then select the Jobs tab.
- Select Add > Job from the top menu
- A popup is displayed. Enter the Job details. Mandatory details are highlighted in red. You can choose to jump to a particular section by clicking on a section under Jump to. The Create button will remain disabled until all the mandatory details have been successfully entered
- Click Create after you finish entering all the details
Note
If the Client you are searching for does not exist, you can create a new Client by clicking on + New Client button. For example, you search for a Client called 'ABC' via Client and it does not exist, you can create a new Client called 'ABC' by clicking on + New Client.
See also: adding Clients.
See also: mark a Job as confidential
See also: understand Next related Job and Previous related Job fields
Filter Jobs
On the Planner
See filtering information on the Planner.
On the List view page
- Click List view from the left navigation menu, then select the Jobs tab.
- Use the Job filter which can be found just below the top menu
- Select a criterion and one or more values to filter. For example, you may select Job Location as the criterion and 'Pune' as the value. Only Jobs located in Pune will be displayed in this case
- Click Apply. A list of matching search results is displayed
By the Jobs that you manage
- Click List view from the left navigation menu, then select the Jobs tab.
- Select View > I manage from the top menu
- Only the Jobs that you manage will be displayed
By the Jobs requiring action
Planners are able to view Jobs that require action by using this filter. When Roles are requested the Job will require action.
- Click List view from the left navigation menu, then select the Jobs tab.
- Select View > Action required from the top menu
- Jobs requiring action will be displayed. The number in the Action Required column indicates the number of Roles that have been requested by someone other than the logged-in user. See screenshot below.

View Job details

- Click List view from the left navigation menu, then select the Jobs tab.
- Click the 3-dot menu for the Job
- Click Job Details. You may edit the Job details from the window that is displayed
Edit a Job
When editing a Job, if the Client you are searching for does not exist, you can create a new Client by clicking on + New Client button. For example, you search for a Client called 'ABC' via Client and it does not exist, you can create a new Client called 'ABC' by clicking on + New Client.
On the List view page

- Click List view from the left navigation menu, then select the Jobs tab.
- Click the 3-dot menu for the Job you wish to edit. A menu will be displayed
- Click the Edit Job button
- Edit the Job details
- Click Save changes
By selecting an option from the top menu
- Click List view from the left navigation menu, then select the Jobs tab.
- Click Edit > Manage Jobs from the top menu.
- Search for the Job you wish to edit by entering the Job name in part or full
- Edit the Job details
- Click Save changes
Bulk edit Jobs
- From the navigation pane, select List view.
- From the top bar, select Jobs. Retain switches to Jobs view.
- Locate the Jobs you want and check the boxes for each one.
-
Click Edit, then click Edit Jobs.
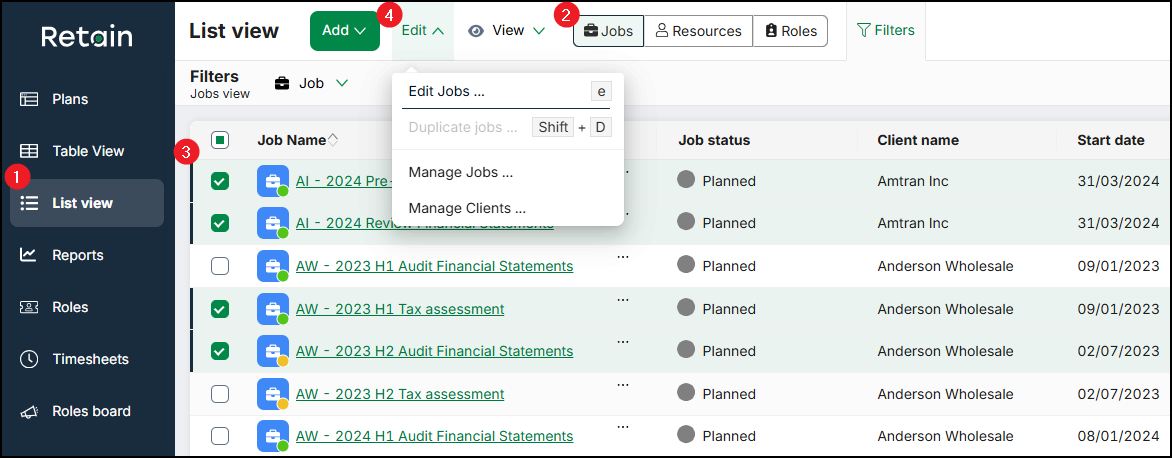
The Edit Jobs form opens. The top of the form displays the number of selected Jobs and the primary details of each one.
-
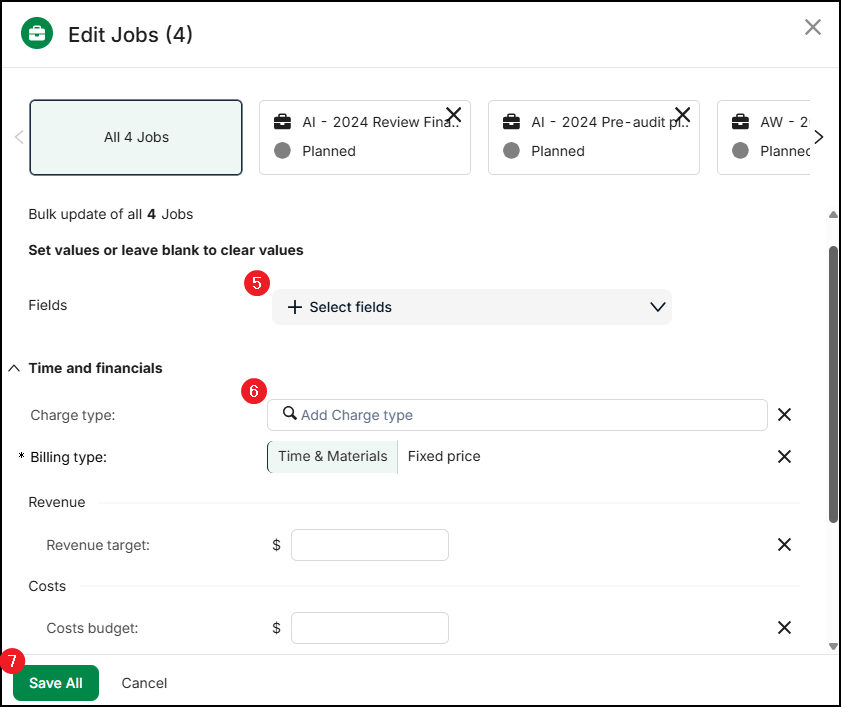
Select the Fields you want to edit.
- For each field, select the new value you want.
- Click Save all.
Retain updates the data for all of the selected Jobs.
Note
- The maximum number of Jobs you can bulk edit at once is the number of visible Jobs on the grid. Use the pagination options to change the number of visible Jobs on the grid.
- You must have permission to edit Jobs individually to be able to edit them in bulk.
Delete a Job
Note
Deleting a Job deletes all its associated Bookings.
Delete a Job from the grid:

- Click List view from the left navigation menu, then select the Jobs tab.
- Click the 3-dot menu for the Job you wish to edit. A menu will be displayed
- Click the Edit Job button. A popup showing the Job details is displayed
- Click Delete Job
- Confirm to delete
Delete a Job using the main menu:
- Click List view from the left navigation menu, then select the Jobs tab.
- Select a Job by clicking the adjacent checkbox
- Select Edit > Edit Details from the top menu
- Click Delete Job
- Confirm deletion
Duplicate a Job with Bookings
You can duplicate a Job which has Bookings from the following places:
- Select a Job from the List view page and select Edit > Duplicate Job from the top menu
- Select Duplicate from the Actions menu on the Jobs pane (accessed via the Plans page or List view page)
- Select a Job from the List view page and select Duplicate Job from the 3-dot menu
You can duplicate up to 100 Jobs at a time. While the duplication of a Job is in progress, the other Jobs to be duplicated will be held in a queue.
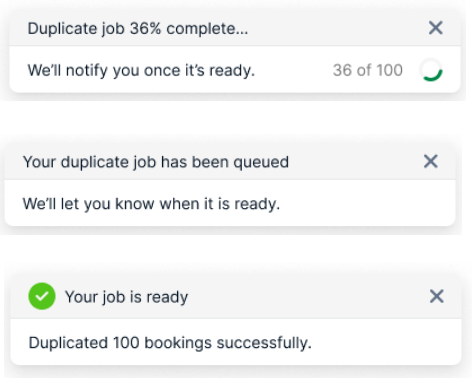
A queue notification is displayed if more duplications are being performed at the same time. An in-progress notification displays the % completion of your task.
For example, if user A duplicates a Job while user B is in the process of duplicating another Job, the queue notification will appear for user A and the in-progress notification will display for user B. The queue notification also includes a link to the Operation Log allowing you to view the progress of your operation.
A success/failure message will be displayed after the operation is complete. Duplication can fail due to the following reasons:
- Lack of permissions
- No Bookings on the Job
To duplicate a Job:
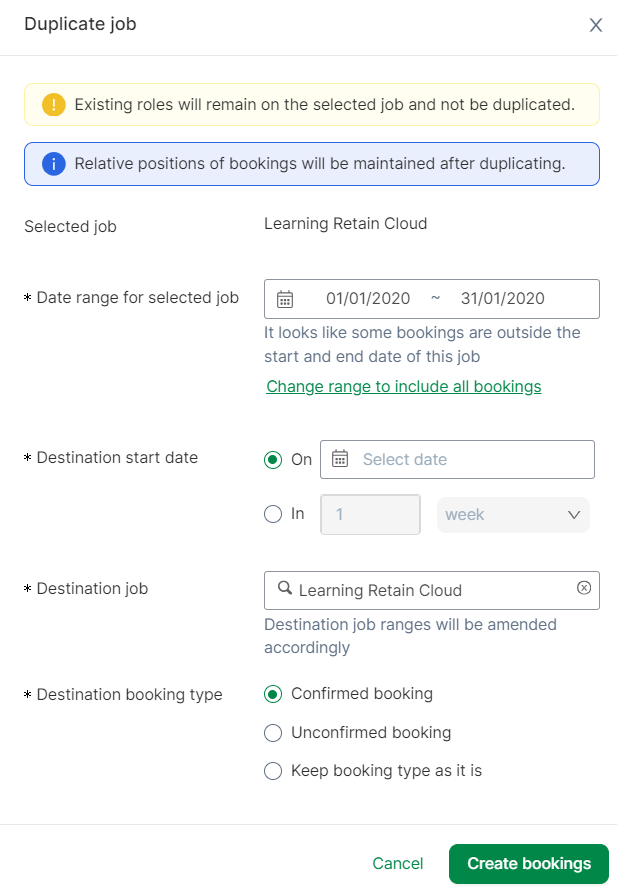
- Select one of the methods mentioned above
- A pop-up is displayed
- The date range for the selected Job is displayed. Change the date range to a range you want (must be within 24 months from the current date). All whole Bookings associated with Jobs within the original date range will be duplicated to the new date range
- If you have Bookings outside out of the date range for the selected Job field, click on Change range to include all Bookings to change the date range to include the Bookings that fall outside the Job date range. (Click revert to start and end dates to revert to your original Job dates if you change your mind)
- Enter the destination start date. Bookings will be duplicated relative to this start date
- Enter the Destination Job. If the Job you want does not exist, create one by clicking +New Job
- Click Create Booking
The Job will be duplicated.
Note
- You must have Create Booking access to duplicate a Job
- Roles associated with the Job will not be duplicated
- The Destination start date in n week/month/year is from the first date of the first Booking in the date range for selected Job
- If a Job has no start and end dates, or is missing one of them, the date range for all Bookings on that Job will be used (start date of the first Booking and end date of the last Booking)
- The duplicate destination Job will list the same Job by default
- if you specify a date range which is more than 24 months from the current date, hours may be dropped from your diary
Duplicate multiple Jobs
See Duplicate data. Note: You need to have Administrator privileges in order to do this.
Mark a Job as confidential
Jobs marked confidential will only be visible to those with access permissions.
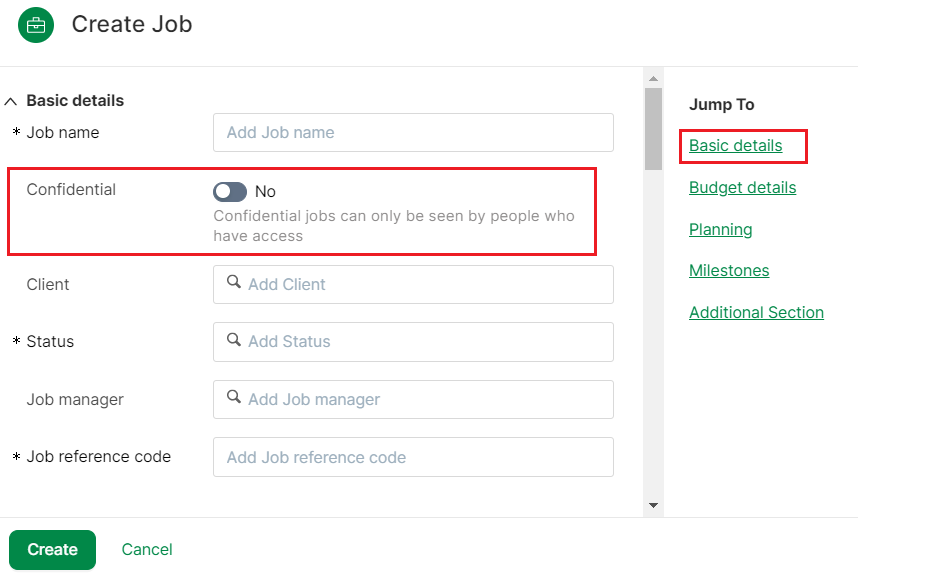
Toggle the Confidential switch found in the Basic details section to Yes to mark the Job as confidential. This can be done while creating or editing a Job. Confidential Jobs cannot be viewed by other users. Hidden Jobs marked as confidential will always be visible to users booked on the Job, but will not be visible to users who created the Job.
Also see, control read access to planning data.
Maintain milestones
You can:
- view Job timeline graphically in Jobs view on the Planner
- add, edit, remove and complete Job milestones
- view milestones graphically in Jobs view on the Planner
- understand how Job timelines and milestones are displayed on the planner
- view milestones and Job timeline bar in the Legend
- report on milestone fields
Note
if you have permission to view and edit a Job, you will also have permission to maintain the Job's milestones.
View Job timeline on the planner
You can show/hide Job timeline on the planner by using the toggle Job timeline on the Show menu. Showing the Job timeline displays the Job start and end dates.
View milestones
Click Jump to on the Jobs page to view information about Milestones. You can also click on the Jobs pane on the Planner and then click More info > Milestones. On the Planner, milestones will be displayed in both the Jobs view and the Resource view. You can show/hide milestones by using the toggle Job milestones on the Show menu.
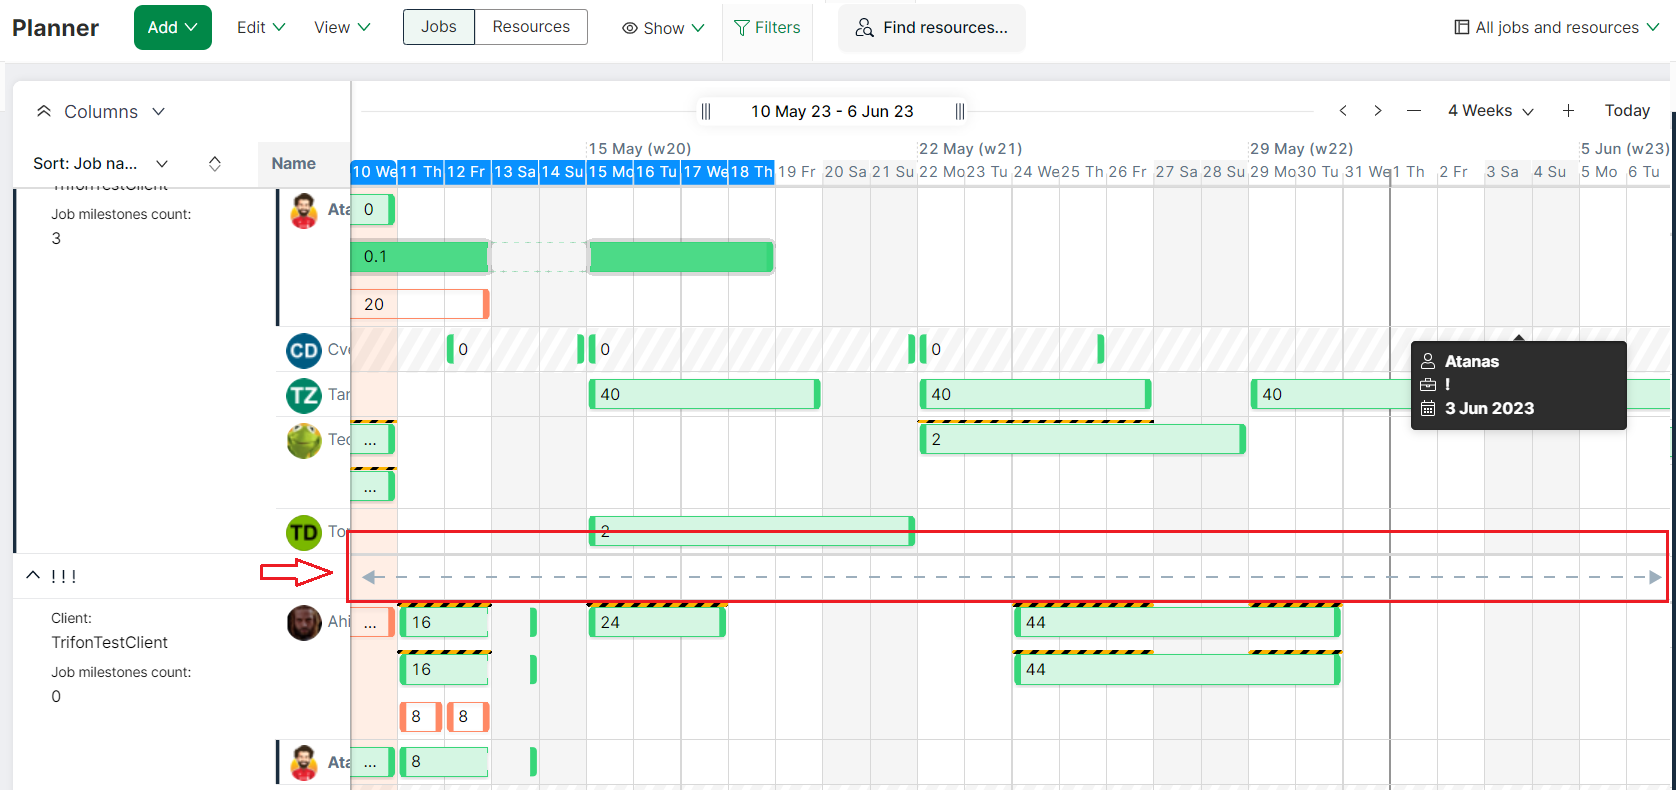
Understand milestone and Job timeline display
Milestones have the following states and symbols:
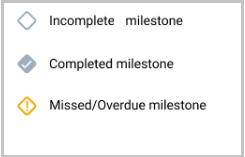
If there are more than one milestones for a single cell, the milestone symbol will be an incomplete diamond with a number inside specifying the number of milestones on that cell. If the number is more than 9, then 9+ will be displayed in the diamond symbol. Hovering over the milestone symbol will display the list of milestones on that cell.
The following rules are followed when displaying Job milestones and timelines:
Solid line is displayed when both Job start and end dates are set:

Dash line is displayed when:
- both Job start and end dates are not set
- Job start date set, end date not set
- Job start date not set, end date set

Line end with a corner and an ellipse is displayed when:
- Job start/end date are on the cell
- Booking/Role start/end date are on the cell (when Job dates are not set)

Line end with an arrow is displayed when:
- Job start/end date is outside the visual display window
- Job start/end dates are not set

Line end with an ellipse is displayed when:
- Job start date is during the weekend which is hidden
- Job end date is during the weekend which is hidden

Add milestones
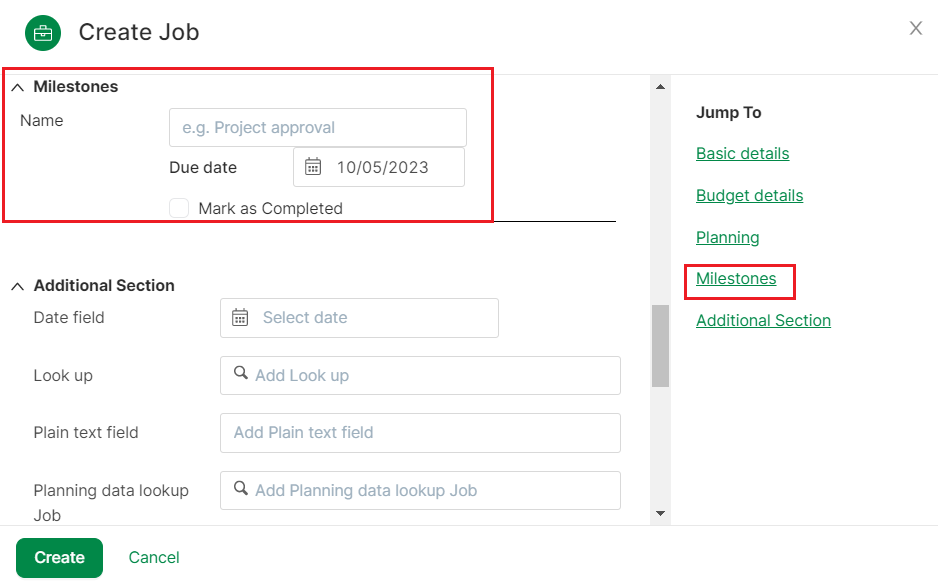
You can add milestones while adding or editing Jobs.
-
Select Milestones
-
Enter a name and due date for the milestone
- Click Create to save changes
Edit/Delete/Complete milestones
- Edit a Job
- Click More info → Milestones
- Edit fields as required. You can add another milestone or mark a milestone as complete by checking the Mark as completed button
- You can also delete a milestone by selecting the trash icon next to the milestone
- Save changes
Set the financial details of a Job
When you set the financial information and targets for a Job, Retain automatically compares them to the current values, and warns you if you are over or under your targets.
- Select the Job you want to edit, open the Jobs pane, and scroll to the Time and financials section.
- From Charge type, select whether the Job is Chargeable or Non Chargeable.
- From Billing type, select whether the Job is charged by Time and Materials or at a Fixed price.
- Set the Revenue target for the Job.
Retain calculates the Revenue as booked from the total revenue of all planned Bookings on the Job. If the Revenue as booked is lower than the Revenue target, Retain displays the value in red. - Set the Cost budget for the Job.
Retain calculates the Cost as booked from the total costs of all the planned Bookings on the Job. If the Cost as booked is higher than the Cost budget, Retain displays the value in red. - Set the Profit target for the Job.
Retain calculates the Profit margin as booked from the all the planned Bookings on the Job and displays the percentage value. If the Profit margin as booked is lower than the Profit target, Retain displays the value in red. -
Set the Hours budget for the Job.
Retain calculates the Total hours booked from the total hours of all the planned Bookings on the Job and displays the percentage value. If the Total hours booked is higher than the Hours budget, Retain displays the value in red.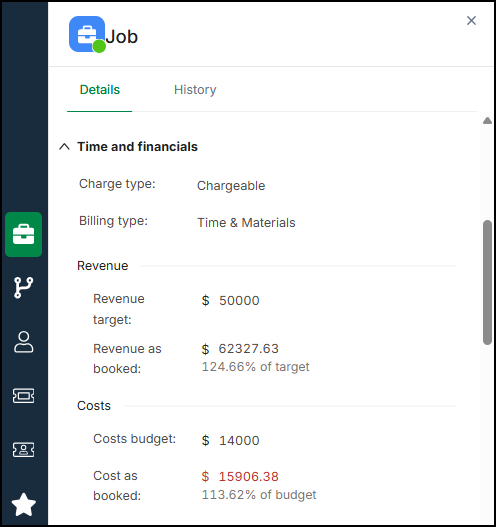
Action Roles
- Filter Jobs to be actioned
- Click on the Scenario for the Job requiring action. This will show you a page with Scenarios and associated Roles
- Select a Role and then select the action from the Action dropdown
- Save
Associate a FTE reference diary with a Job
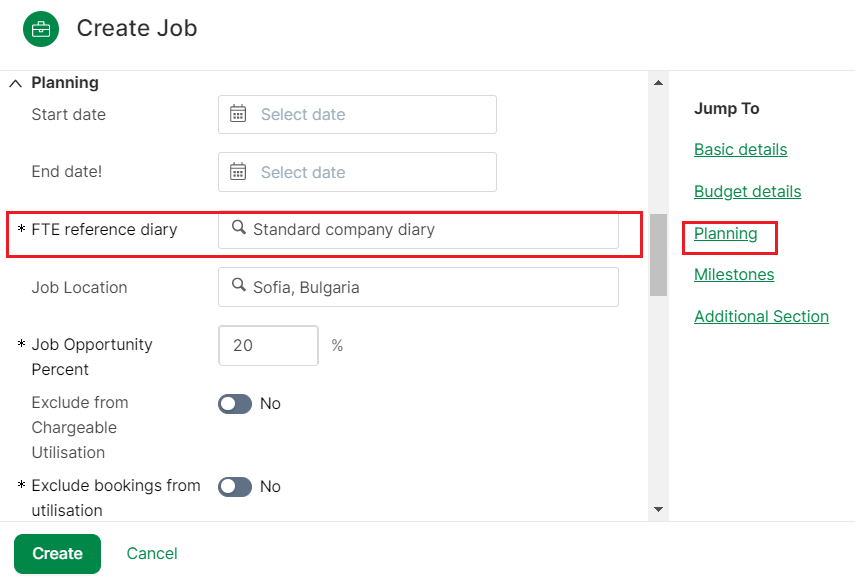
The FTE Reference Diary determines how FTEs are calculated for the Job and for the Bookings booked on that Job. Select the FTE Reference Diary to associate with your Job.
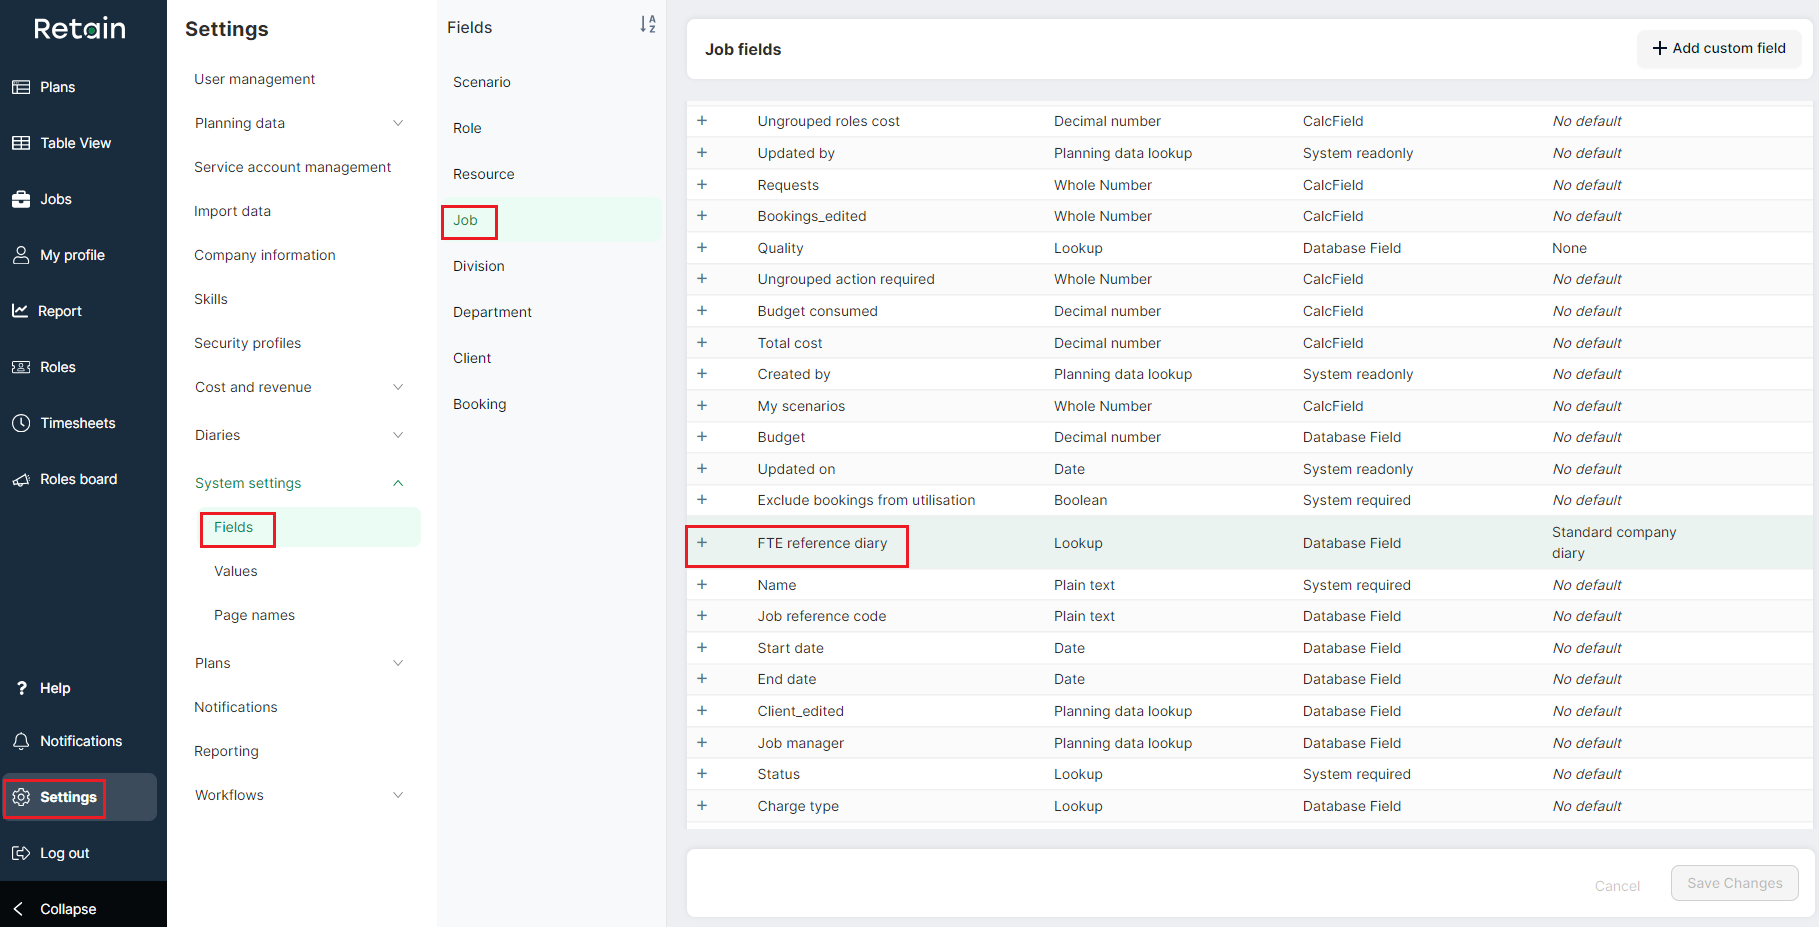
The FTE Reference Diary field is a built-in Job field as can be seen from the screenshot above. The Diaries that you create will appear as options that you can select when editing the FTE reference diary field.
Note
If the 'FTE reference diary' field is cleared and/or the default value is removed, FTEs will not be calculated for that Job and the FTE calculations will be 0.
On the planner, you can add the new FTE reference diary Job field to the parent and/or child record using columns.
Attach documents
See Upload and Attach documents for more detail on uploading and attaching documents.