Understand plans
Understand plans
You may filter the records that are displayed and save them as a plan. For example, you may be interested in resources that work in the New York office. In order to do this, you can use the Filter pane to display details of the resources located in New York. You can then save this view as a plan so that you can come back to it in the future.
Plans are saved views of filtered records. They offer a view of the records that you are interested in. A plan can be public or private.
All users can create public plans which can be read-only or editable. Public plans will be visible to all general, active users within your organisation. They cannot be viewed or accessed by random users over the Internet.
Private plans are personal to the creator and cannot be viewed by other users, but it is possible to change a private plan to a public plan.
Access plans

-
Select Planner from the left navigation menu
-
The default plan is displayed for the first time and the most recent plan will be displayed thereafter
-
The name of the plan is displayed as highlighted
Understand the default plan
-
The default plan is displayed when you first launch the application and it shows the jobs that you are booked on and your associated bookings
-
The default plan is a public plan
-
Edit and Delete options are not available for the default plan
Create a plan

- Select Planner from the left navigation bar
- Select the name of the plan
- Select New Plan from the menu that drops down. (You may select Manage My Plan -> New Plan instead)
- A new plan showing all the resources and jobs for the organisation is created
- The default visible range for a new plan is one month from the current date
- New plans are created with the name New Plan(x) with x incrementing with each new plan. For example, New Plan (1) for the first plan or New Plan (5) for the fifth plan
- When created using Manage My Plan, the plan name appears in the list
Save your view as a new plan

You can save your current view as a new public or private plan by selecting the Save as a new plan option from the Plan menu. If you choose to save as a public plan, you can also select whether you want your public plan to be read-only or editable.
Switch between plans if you have more than one plan
Note
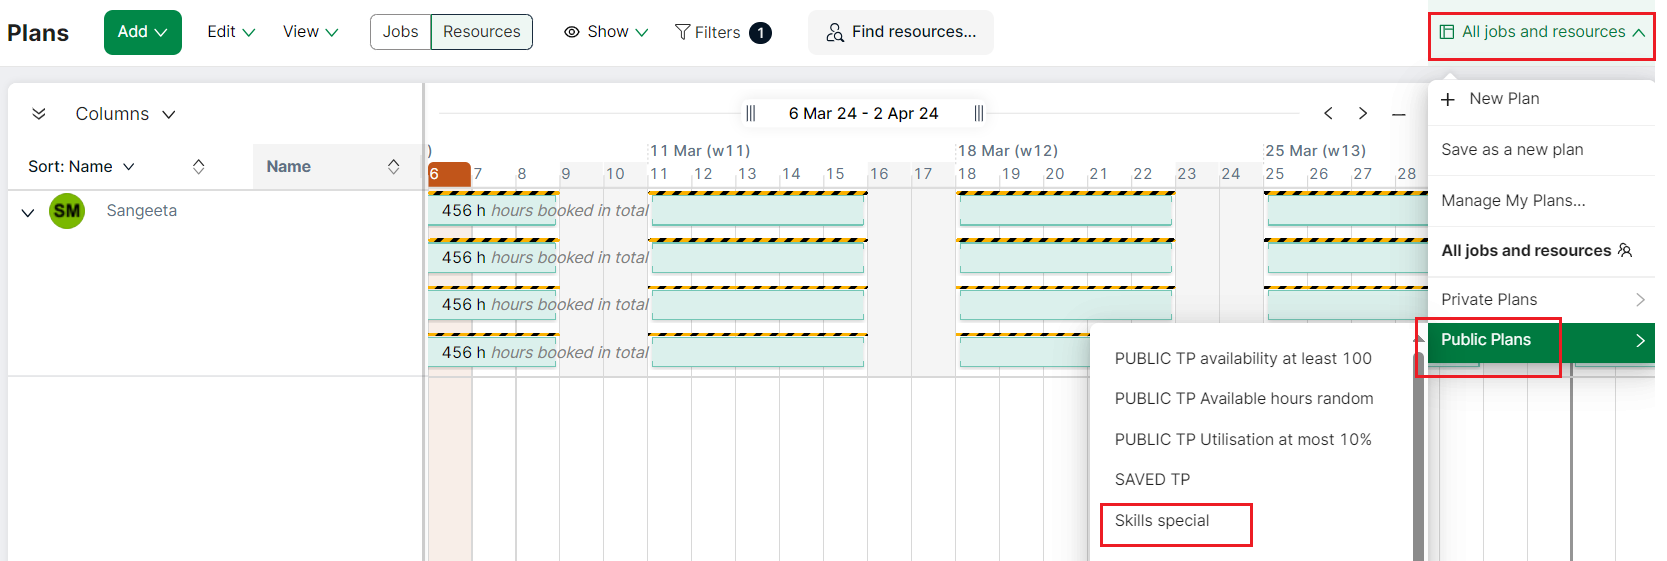
Click on the name of your Plan to display the Plan menu.

- If you have more than one plan, the most recently accessed plan will be displayed in the Plan menu under Private Plan and Public Plan. For example, the screen above shows a list of most recently accessed Public Plans
- Switch between your plans by selecting your plan from the Plan menu
- The active plan in the most recent list is highlighted in a darker shade
Multi-select bookings and roles by rectangular drag
Quickly select multiple bookings and/or roles on your Plan by dragging with a mouse:
- Press and hold the Alt key from the keyboard
- Click, hold and drag with the mouse cursor, over the bookings/roles you want to select, to create a rectangular or square selection
- Release the Alt key and the mouse cursor (this can be in any order)
Bookings and/or roles in (or touched by) the rectangular/square area are now selected.
Note
- Multi-select by drag behaviour works in both Jobs/Resources view and for expanded/collapsed rows
- You can select up to 50 bookings/roles
- Any bar that the square/rectangle touches is included in the selection even if not fully in the square/rectangle
- To deselect a previous selection, simply make a new selection