Understand fields
Field Types
Different field types are used to store and capture different types of data.
- Plain text: a string of text up to 255 characters
- Formatted text: a longer string of text that may contain line breaks and up to 4000 characters
- Whole number: a whole number that can (optionally) be formatted as a currency, currency per hour, hours, days, FTE, hours per day, percentage and be set to fall within a min/max range. (Currency symbols are driven as set in currencies)
- Decimal number: as above, with an additional option to set how many decimal places are displayed
- Note: raw decimal numbers are stored at maximum precision and this option applies rounding
- Date: a single date
- Boolean: stores a true/false value presented as a yes/no switch
- Look-up: a single value that is selected from a predefined list
- Multi-select (or multi-value) lookup: multiple values that can be selected from a predefined list
- Planning data lookup: a single piece of planning data (a resource, job, or client)
- History: multiple paired date + lookup values (See also: using history fields)
Field Categories
Administrators with access to field settings can always edit field labels and descriptions.
Depending on the category of a field, other field settings may have restricted or pre-determined behaviour.
- Database field
- User editable
- Can optionally be set to mandatory
- System Required
- Required for Retain Cloud to function
- Will always be mandatory
- System Readonly
- Values are stored in the database, and automatically set and updated by Retain Cloud
- Always readonly
- Calculated Field
- Values are calculated on-demand based on the value of other fields set against planning data in the application
- Always readonly
Custom fields
Retain Cloud allows you to create your own fields - these are known as custom fields.
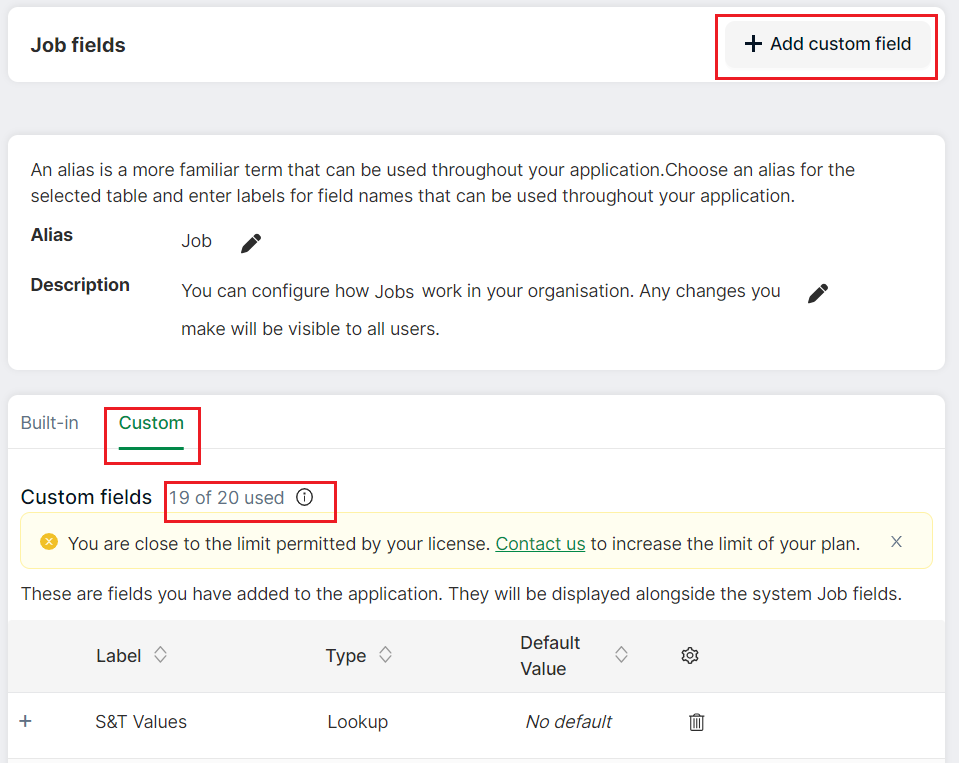
Based on the licence that you have purchased, you are allowed to create a certain number of custom fields only. 20 custom fields per entity are supported by default.

- Select Settings → System Settings → Fields from the left navigation menu
- Click on the Custom tab
- Click Add custom field
- Select the type of custom field that you wish to add from the list that is displayed. If the field that you wish to add is a lookup field, see create custom lookup fields
- Fill in the values. Also see custom field format
- Save changes
- Custom fields are displayed in their own tab as highlighted on the screen above
Custom field format

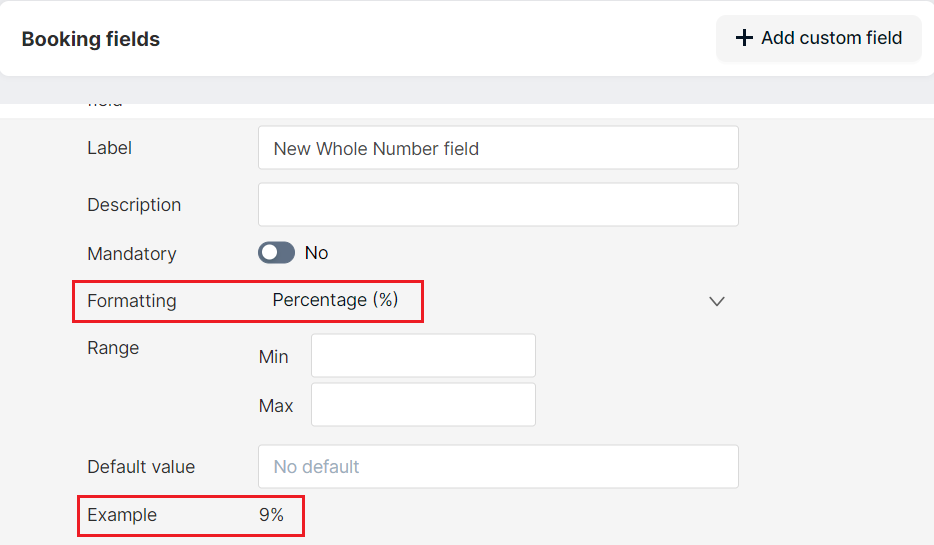
When creating or editing decimal and whole number custom fields, select Formatting from the dropdown. For example, you can select percentage or currency or any other suitable format. An example of the format will be displayed - 9$ or 9% depending on your selection. This enables users to see immediately the type that the field represents (whether percentage or currency or days or something else) across the application.
Custom lookup fields
- Select Settings → System Settings → Fields from the left navigation menu
- Click on the Custom tab
- Click Add custom field
- Select Lookup from the list that is displayed
- You may either use an existing list of values or create a new list of values
- To use an existing list of values, simply select the existing Values list that you want
- To create a new list of values, enter the name of the lookup list and then enter each value separated by a comma
- Click Save changes
Custom history fields
- Select Settings → System Settings → Fields from the left navigation menu
- Click Add custom field
- Select History from the list that is displayed
- You may either use an existing list of values or create a new list of values
- To use an existing list of values, simply select the existing Values list that you want
- To create a new list of values, enter the name of the lookup list and then enter each value separated by a comma
- Click Save changes
To delete a custom field:
- Select Settings → System Settings → Fields from the left navigation menu
- Go to the Custom tab
- Click on the trash icon to delete the associated custom field
Field Validation rules
- Select Settings → System Settings → Fields from the left navigation menu
- Select the entity (either Jobs, Resources, Bookings or Clients) that you wish to configure. A page displaying the configurable fields of the selected entity is then displayed
- The top of the page displays the alias that you have selected for this entity along with its description. The Alias and Description can be edited if required by clicking on the edit icon
- Select the arrow that appears next to the field name. A drop-down section is displayed
- Select whether the field is going to be mandatory by selecting Yes or No
- Enter the maximum number of characters that the field will accept
- Depending on the field type and field category, different types of validation rules will be available for each field:
- Is the field mandatory?
- The maximum number of characters that plain and formatted text fields field can contain
- The minimum + maximum value that a decimal and whole number fields will accept
- Set the default value for the field, if applicable (does not apply to Calculated Fields, System readonly, System hidden, Date, History and Multi-select lookups field types). Default values cannot be inherited. Boolean fields will be set to No by default
- Confirm changes to save