Diaries and Work Patterns
The Definition of Time
Diaries define time when planning for Resources using Retain Cloud. They form the basis for all calculations to do with availability, utilisation, conflicts, cost, revenue and more.
Each Resource must have a diary assigned to their diary history field — by default this will be the standard company diary.
The expected working hours for a Job are defined by the Job reference diary.
Diaries are constructed of Days and Work Patterns that set out which days and how many hours on those days that a Resource works.
A simple example to demonstrate availability vs utilisation:
Example
Boris has 40 hours working time Mon - Fri (8 working hours per day).
Boris is booked Mon - Wed for 20 hours per day (60 hours in total).
For the observed range of Mon - Fri, Boris's calculations are as follows:
- Availability 0%
- Utilisation 150%
Even though Boris is not booked on Thu or Fri, his cumulative booked time (60 hours) has exceeded his working time (40 hours) within 3 days of the 5-day observed date range.
Set up Days
Days define how much time exists on the working and non-working days of your organisation.
There are 2 types of day:
- Work days contain work time
- Think this as regular working time
- When Resources are assigned to Bookings, by default only their work time will be consumed
- Work days appear as white cells when viewing plans by day/week
- Non-work days: contain contingency time
- Think of this as paid time that can be worked, if necessary e.g. weekends
- When Resources are assigned to Bookings that are set to include non-working days, their contingency time will be consumed
- Non-work days appear as grey cells when viewing plans by day/week
To set up a day:
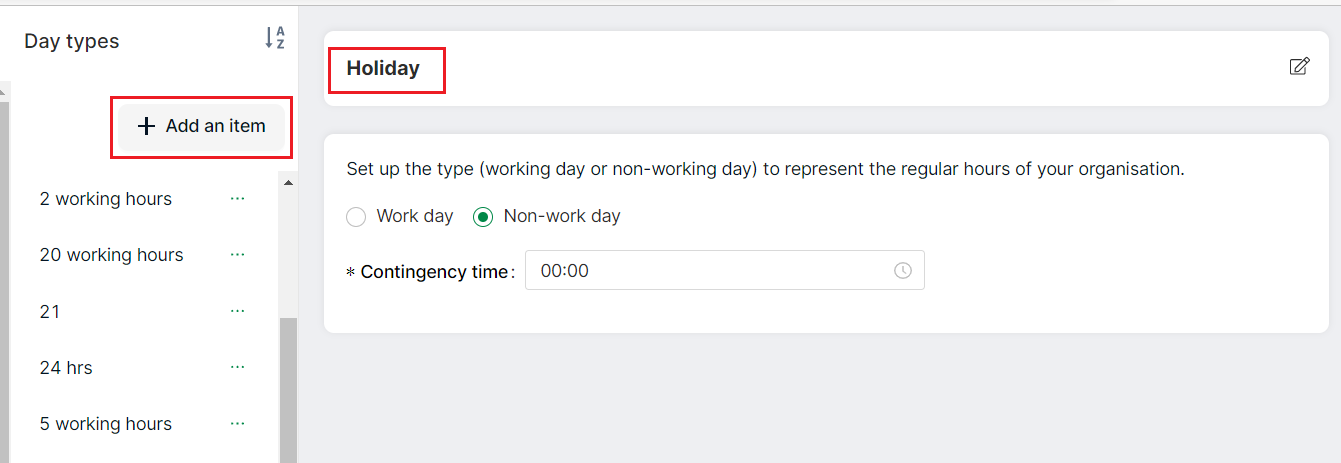
- Select Settings → Diaries → Day Types from the left navigation menu.
- Select Add an item
- Enter a name for your day type in the Untitled Day Type box, for example, Holiday
- Select whether the day is a working day or a non-working day
- Enter the duration of the day. For example, a working day may have the duration of 8 hours. A non-working day may have a contingency of 8 hours or even 0 hours
- Save changes
Set up Work Patterns
Work patterns are constructed of days and are typically 7 days long. They repeat continuously during the period of time over which they apply, as defined in the diary.
To create a work pattern:
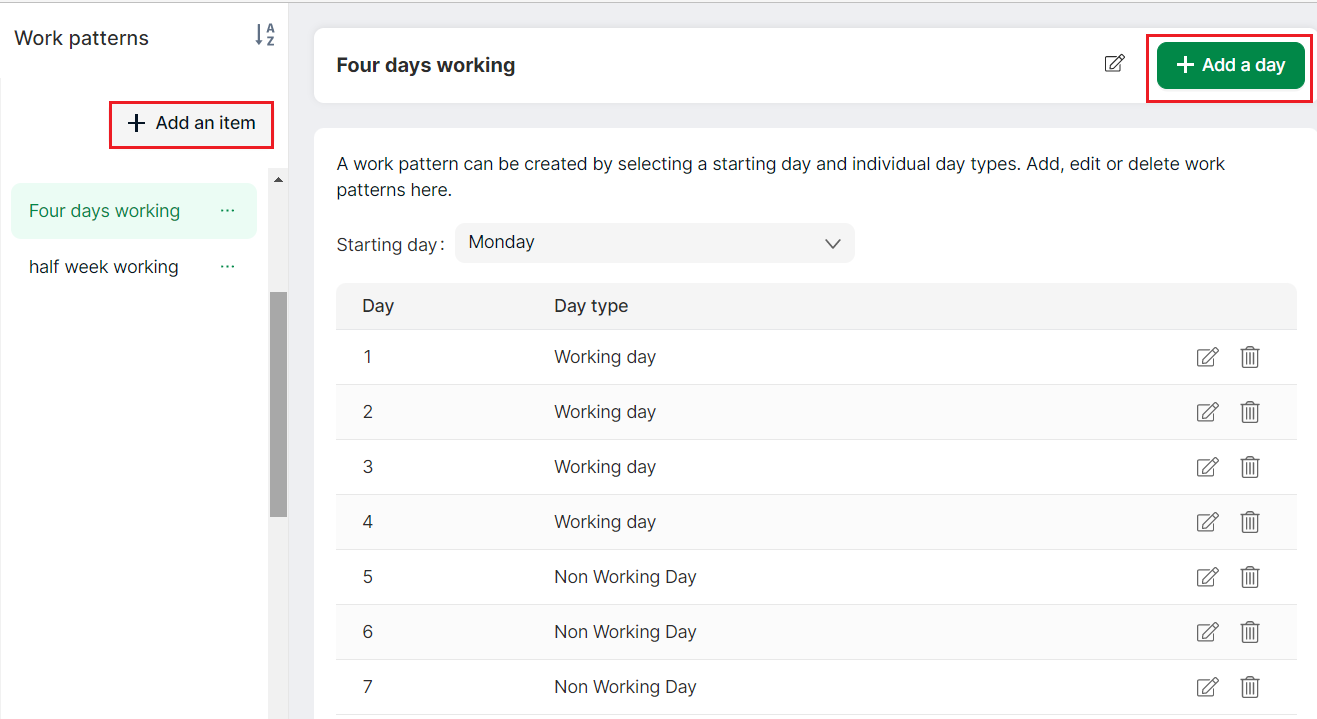
- Select Settings → Diaries → Work patterns from the left navigation menu
- Under the Work Patterns column, click Add an item
- Enter a name for the work pattern. For example, if your working week consists of a full working week you may name the pattern ‘Full time Mon-Fri’
- Click Add a day to add days to your week
- Select the starting day of your working week. This is Monday by default
- Select the Day Type for every individual day
- Ensure that you select Day Type as Weekend for your weekend
- Save changes to confirm
Set up Diaries
Diaries bring together days and work patterns into a schedule of time that Resources work.
Diaries layer this information in the following priority order:
- Standard work pattern: the base working pattern that repeats forever
- Custom periods: a date range over which a specific work pattern is available e.g. the final week at the end each quarter may have a special 'busy period' work pattern that contains additional working time
- Custom days: single days that have specific work/non-work time e.g. public holidays — These will always take priority over a custom period and the standard work pattern
Set up your diaries to match the contractual or standard work patterns that Resources in your organisation use.
Example
If your company has full time employees in the USA and Australia, and only part time employees in the UK, you might set up 3 diaries for your resources:
- AU Mon-Fri Full Time
- UK Mon-Fri Part Time
- US Mon-Fri Full Time
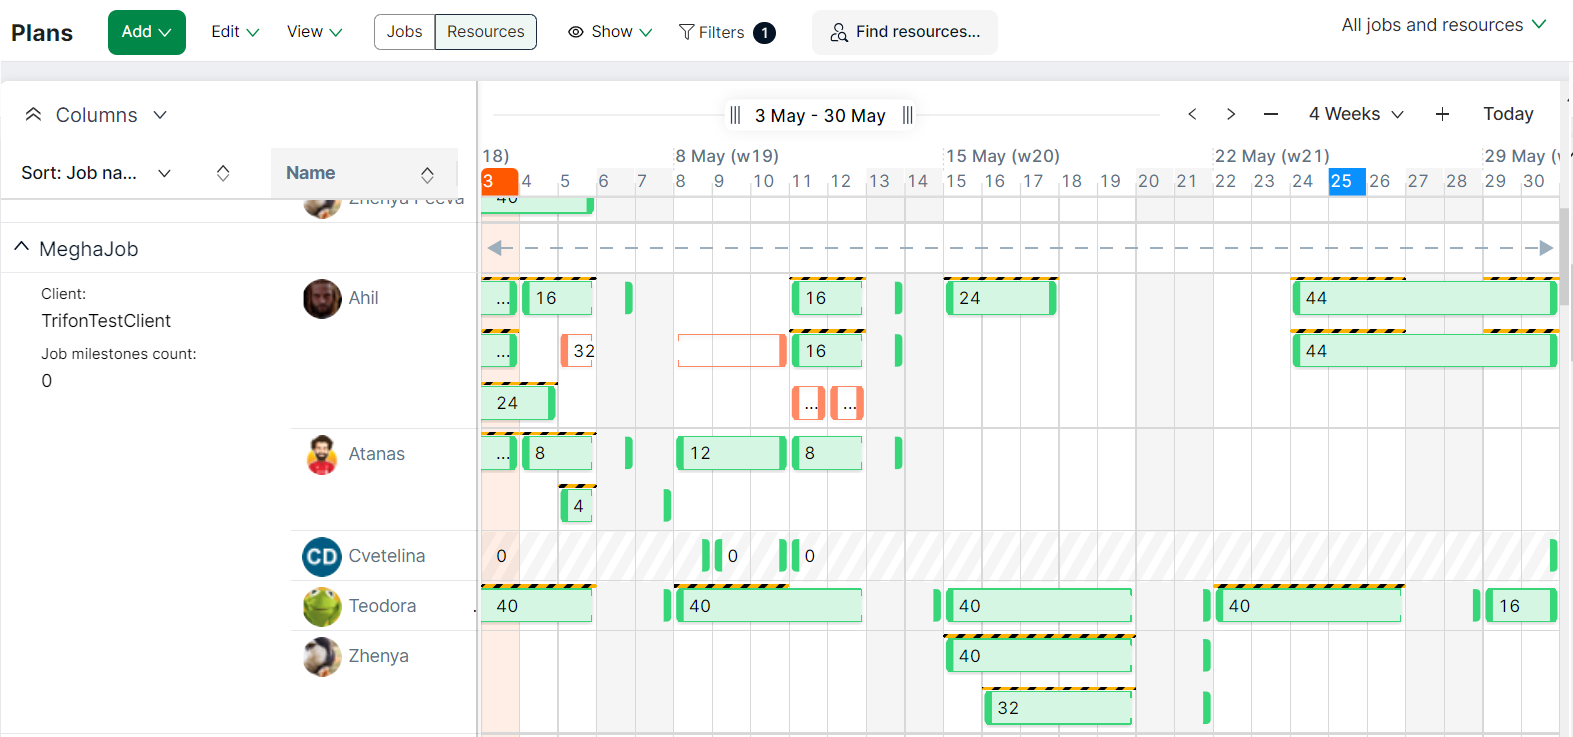
Displayed below is how different Resource diaries appear in the Job View. The white cells indicate working days. The grey cells indicate non-working days. 'No diary time' is indicated by grey, diagonal lines in the cell.
Adding Diaries
Diaries can be added by click "Add an item" above the list of diaries or duplicating an existing diary.
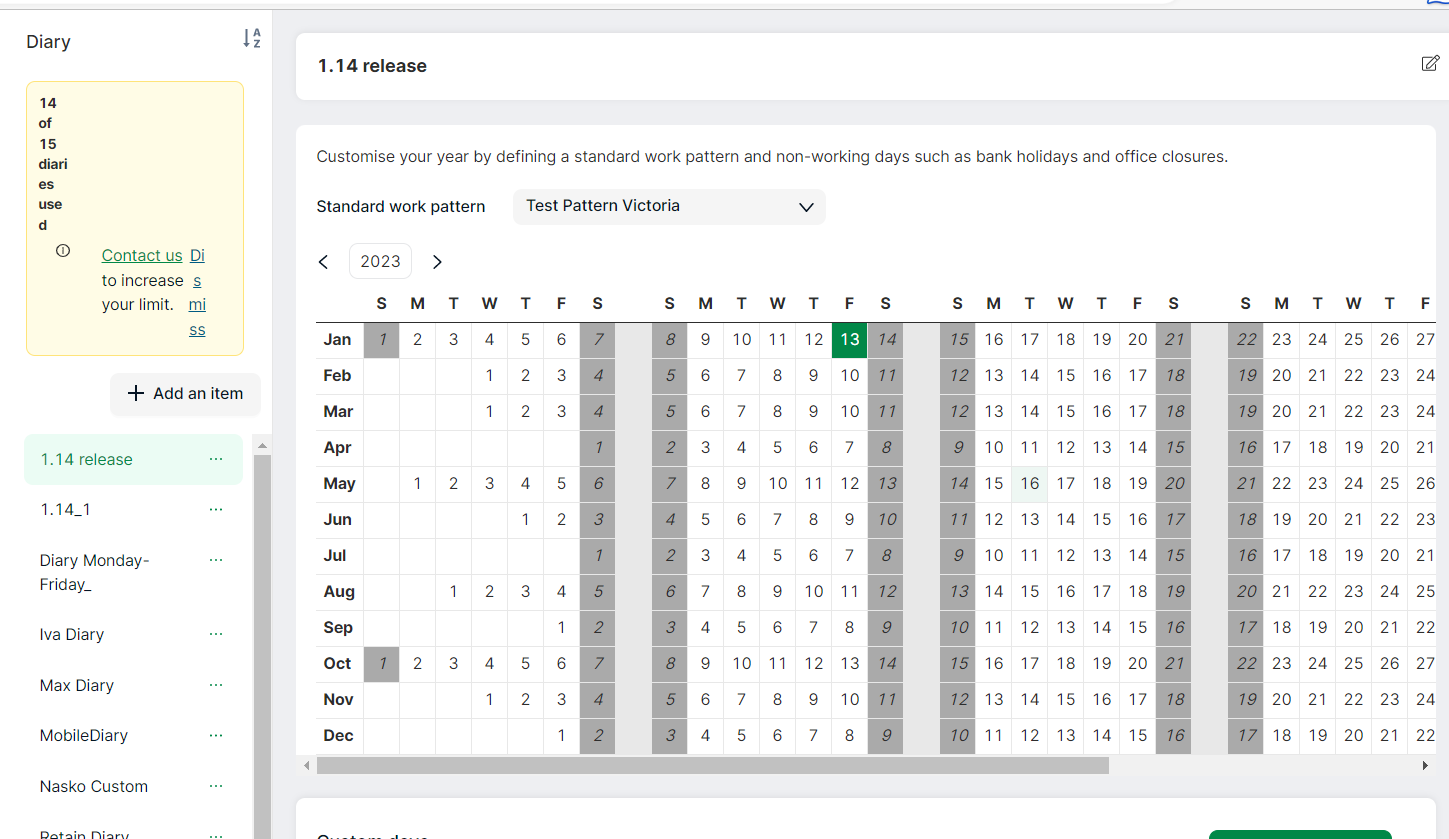
The total number of Diaries that you can add is dependent on your licence. A counter displays the total number available and available. 15 diaries are supported by default. The buttons to add (and duplicate) diaries will be disabled after the limit is reached. A warning will be displayed when you are close to your licence's permitted limit. You may contact us to increase your limit. Click on the Dismiss button to dismiss the warning.
Custom days
Custom days can be added by interacting with the calendar or clicking on the "Add custom day button".
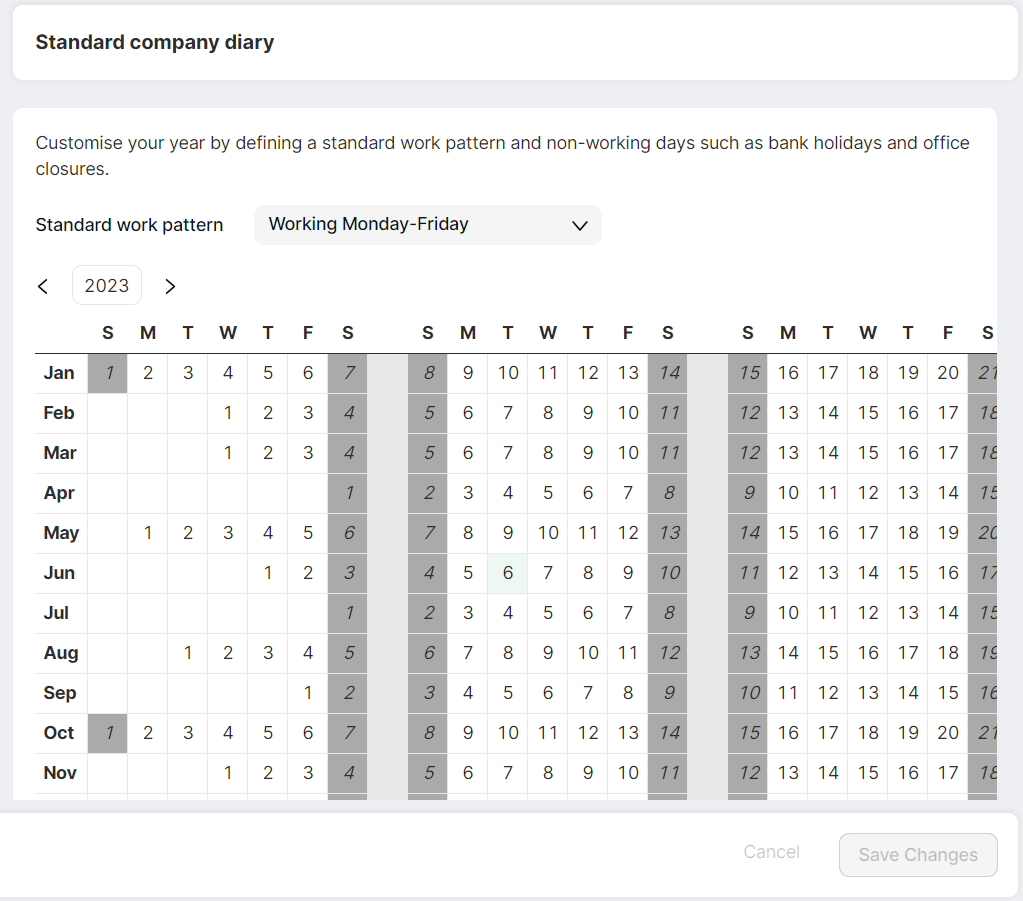
- Select Settings → Diaries → Diary from the left navigation menu. Select the required diary from the list
- A diary view for the current year is displayed
- Select the standard work pattern
- To customise a day, double-click on a day in the Calendar view
- The date that you clicked on is displayed on a popup. You may change this if necessary
- Enter the name of the day. For example, Good Friday
- Select the type of the day. For example, Public Holiday
- Save
- The customised day is now displayed as a highlighted date on the calendar view
- Save changes*
Note
You cannot delete a day that is in use.
Custom periods
Custom periods can be added by interacting with the calendar or clicking on the Add custom period button.
- Select Settings → Diaries → Diary from the left navigation menu. Select the required diary from the list
- A diary view for the current year is displayed
- Left-click on a day to start your period and left-click again on another day to set the end of the period
- The custom period dialog is now displayed
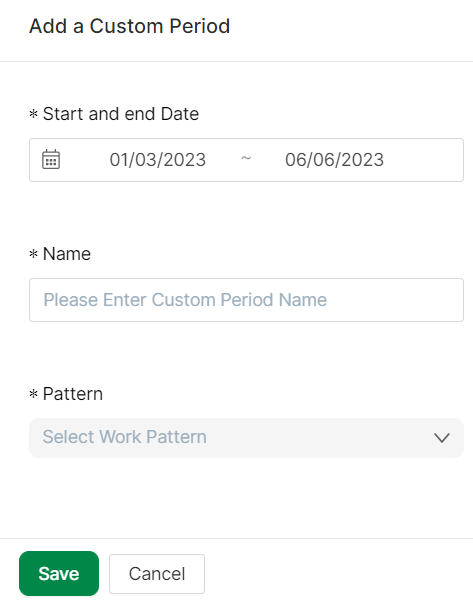
- You may still change the start and end date in this dialog. Confirm that you want to do so in the dialog that is displayed
- Enter a name "Office closed for Christmas"
- Select a pattern. For example, Company holiday
- Save to save changes
- The customised period is displayed with a darker shade in the calendar view
- Save changes
Note
You cannot delete a period that is in use.
The Standard Company Diary
By default Resources that are added to Retain Cloud will be assigned the Standard Company Diary starting on the day they were added.
In situations where time calculations need to be made, and a Resource's diary is unable to be identified, the standard company diary will usually be used as a fallback for calculations.
The Job reference diary
The Job Reference Diary defines the expected working hours for each Job.
This is used for FTE calculations.
By default, the Job Reference Diary is set as the Standard Company Company.
Full Time Equivalent (FTE)
Full Time Equivalent (FTE) is a standard concept of measuring time spent vs expected working time.
- Resource managers in different countries may have different standard working hours for their teams which may need to be compared to one another
- The working hours for a Job may depend on the nature of work e.g. a pro-bono Job for a legal firm may only expect to take 5 hours per-week
FTE calculations allow a way to define the expected working time for any of the above contexts. This is done with the help of a Job Reference Diary.
The Job reference diary is the standard company diary for all Jobs.
When Resources with different diaries are booked on a Job, their respective FTEs are calculated by measuring the proportion of their booked time from their Resource Diary against the expected working hours in the Job Reference Diary.
The following FTE calculated fields are available:
They appear in the Plans page (Jobs and Resources view), plans filters, Booking bar fields, List View page columns, and Reports.
Booking: FTE Assigned
The assigned Resource's diary time that is allocated to a Booking divided by the amount of working time in the Job Reference Diary.
Contingency time in a Resource diary is only counted if "Include non-work days" is selected for a Booking, and 'No diary' days from the Resource diary are ignored.
This calculation is available for both Planned and Unconfirmed Bookings.
Job: FTE In Range
The sum of Booking FTE Assigned for only the planned Bookings on a Job, on the calendar days that intersect with the observed date range in your view (i.e. the visible date range in the plans page or a reporting period).
Job: FTE Total
The sum of Booking FTE Assigned for only the planned Bookings on a Job, on the calendar days that intersect with the Job start and end dates.
A Job must have both start and end dates set, otherwise no value is displayed.