Auto assign roles
The Auto Assign functionality automatically finds the right Resources and assigns them to Roles By Requirement. It finds and assigns Resources to Roles based on the availability of the Resource and their suitability to the requirements of the Role. It can also use AI to find the most suitable Resource when a perfect match is not available.
Enable Auto Assign
Allow users with a specific security profile to use the Auto Assign functionality.
- Navigate to Settings > Security Profiles, select the security profile you want, then open the Roles tab.
- Set the Can auto assign roles by requirements toggle to True.
Retain enables Auto Assign for users with the security profile.

Auto Assign on the Roles page
On the List View page, when you select one or more eligible Roles, Retain enables the Auto assign button. An eligible Role must be by requirement, unassigned, and in the requested state.
- Navigate to List View and select the Roles tab.
-
Click Auto assign.
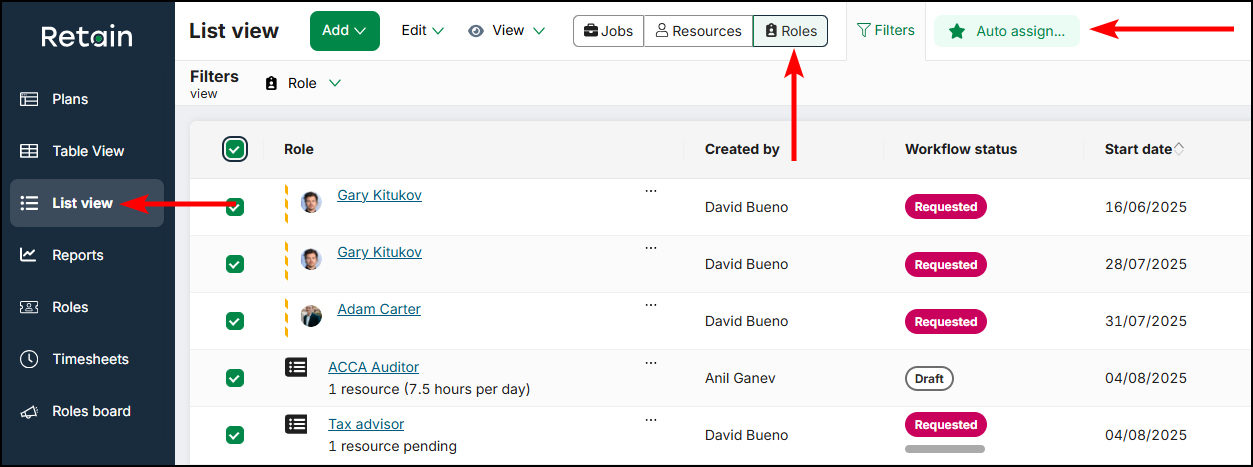
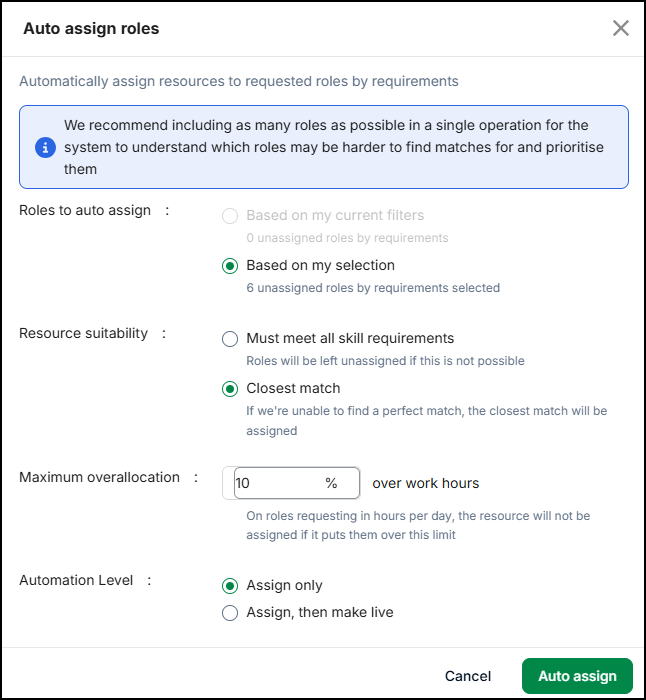
Retain displays the Auto Assign Roles modal.
-
Select the Roles to auto assign.
Retain displays the number of available Roles Based on my current filters or Based on my selection.
-
Select the Resource suitability you want.
If you want to assign Resources who match the requirements exactly, select Must meet all skill requirements.
If you want to use AI to assign Resources who most closely match the requirements, select Closest match.Note
The functionality to find the Closest match for a Role is only available if you enable AI suggestions. For more information and to enable this functionality, Contact us.
-
Set the threshold of Maximum overallocation you want.
For more information, see Maximum Overallocation Threshold. - Set the Automation level you want.
If you want the Auto Assign functionality to assign the Resources and leave the Roles in a requested state, select Assign only.
If you want the Auto Assign functionality to assign the Resources to the Roles and create Bookings from the Roles immediately, select Assign, then make live. -
Click Auto assign.
Retain displays a confirmation message that states that the Auto Assign operation is queued. It prompts you to Check the progress in the operation log.
Note
- The Auto Assign operation produces better results if you include a larger number of Roles in your selection. It allows the Auto Assign functionality to prioritise Roles with more specific requirements and find suitable Resources for them first.
The Auto Assign process
The Auto Assign functionality takes the following steps to assign the most suitable Resources to Roles.
- Check the number of suggested Resources for each Role
- The Auto Assign functionality prioritises Roles with the fewest Resource suggestions.
- This ensures that Roles with more specific requirements have priority over the available Resources.
- Calculate the availability of the Resources
- The Auto Assign functionality prioritises Resources with the highest number of available hours during the dates of the Role.
- This reduces the risk of conflicting Bookings for those Resources, and reduces the risk of allocating too much work to part-time Resources.
- Retain calculates a Resource's availability based on the total number of available hours over the dates of the Role, not based on the percentage of their availability.
- If more than one Resource has the same availability and suitability, the Auto Assign functionality automatically makes a selection.
- Calculate Full Time Equivalent (FTE)
- The Auto Assign functionality makes assignments for FTE in increments.
- The smallest increment is 0.25 FTE.
- This prevents it from assigning Resources to a Role for an impractically short length of time.
- Assign Resources to Roles
- When the Auto Assign functionality assign a Resource to a Role, it excludes them from the remainder of the Auto Assignment operation.
- This reduces the risk of conflicts.
- Create Bookings
- If the operation is configured to Assign, then make live, the Auto Assign functionality makes the Roles live and creates Bookings.
Note
Roles that are already partially assigned are not eligible for the Auto Assign functionality. If a role with multiple FTE requirements already has one or more assigned Resources, you must unassign the Resource or split the role to make it eligible for automatic assignment.
Maximum overallocation threshold
The Maximum overallocation threshold allows the Auto Assign functionality to allocate more hours to a Resource than their working hours by a specified amount.
Example
Corrie has eight hours of working time per day in her diary.
Boris has four hours of working time per day in his diary.
In the Auto Assign Roles modal, in the Maximum overallocation field, you type 50%.
The Auto Assign functionality assigns 12 hours of work to Corrie and six hours of work to Boris.
In the Auto Assign Roles modal, in the Maximum overallocation field, you type 100%.
The Auto Assign functionality assigns 16 hours of work to Corrie and eight hours of work to Boris.
Check the progress in the operation log
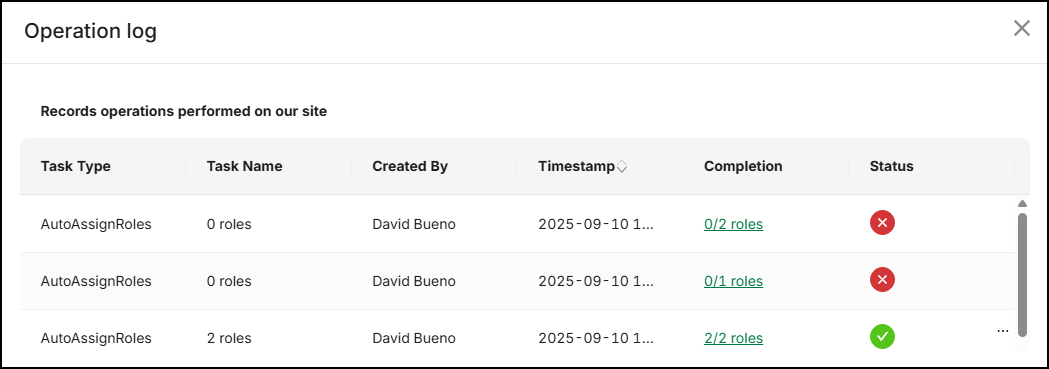
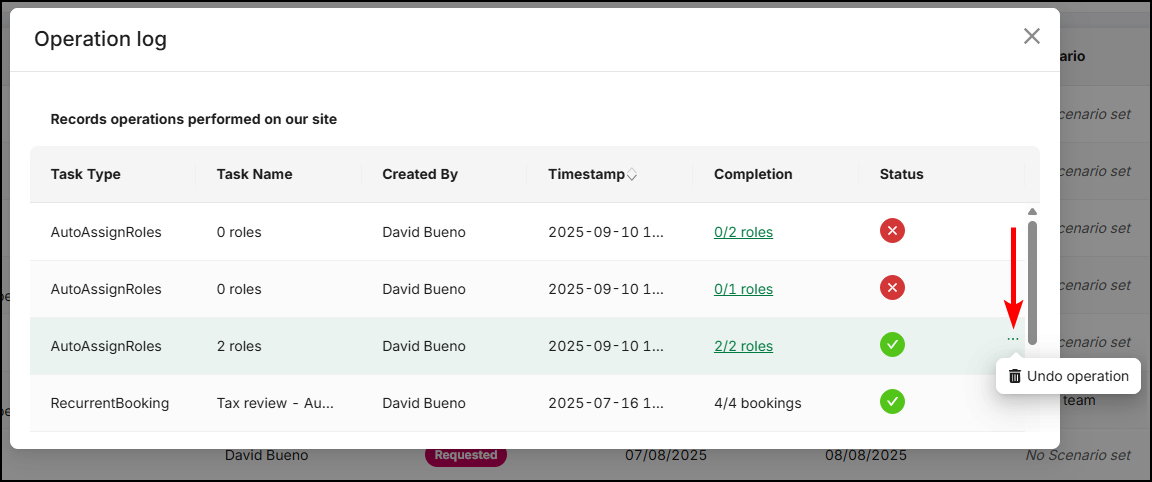
Navigate to the Operation log to see the status and progress of the Auto Assign operation.
The log displays the name of the Role or the number of Roles, the user who triggered the operation, the time of the operation, and the status of the operation.
The operation has one of six statuses.
- In queue
- In progress
- Operation completed with exceptions
- Cancelled
- Operation failed
- Operation complete
If the process is In queue or In progress, Retain allows you to cancel the operation.
The Completion column displays the number of Roles with successful Resource assignments. Click the value to view the completion report.
Undo an auto assignment
If the Auto Assign process is Operation completed with exceptions or Operation complete, Retain allows you to undo the operation.
- Navigate to the Operation Log.
- Locate the operation you want.
The operation must be Operation completed with exceptions or Operation complete. - Click the ellipsis icon, then click Undo operation.
- In the confirmation modal, check the box, then click Unassign.
Retain unassigns the Resources. If it created any Bookings, it deletes them.
View the Auto Assign status of a Role
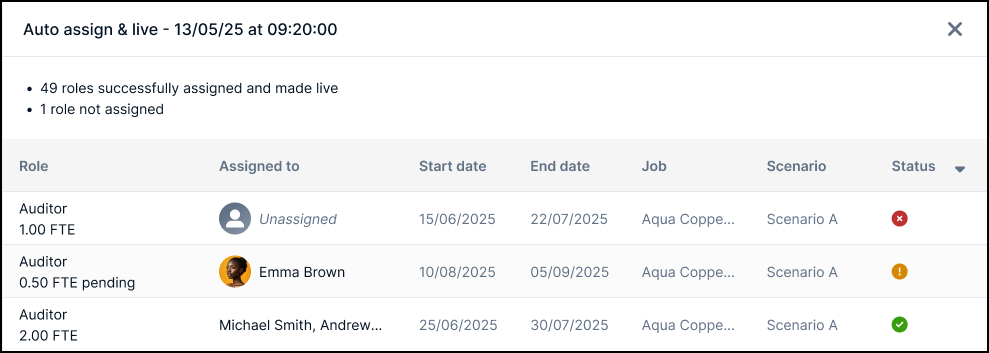
Retain displays the status of an automatically assigned role on the Roles page and the Completion report.
- In queue
- The auto assignment is queued.
- Green check icon
- The Role is Assigned or Assigned and made live.
- Red cross icon
- The process Failed to assign the Role.
- The tooltip states whether the failure was due to No matches or No availability.
- Amber exclamation icon
- The Role is Partially assigned.
- The tooltip displays the reason if there is one.
